DNA sequencing methods: from Sanger to NGS
Written by Éva Mészáros
03. April 2023
DNA sequencing has come a long way since its inception in the 1970s. A major milestone was marked by the Human Genome Project, which was initiated in 1990 and completed in 2003. Based primarily on the Sanger sequencing method, the project aimed to map the entire human genome, and its success has greatly advanced our understanding of human biology and genetics.1 However, as the demand for faster, more efficient and more cost-effective sequencing methods increased, next generation sequencing (NGS) techniques that outperform Sanger sequencing were developed. This has reduced the cost of sequencing an entire human genome from $2.7 billion to just a few hundred dollars over the past couple of decades,2 making personalized medicine and genetic testing more accessible to the general public. Moreover, new research programs – such as All of Us from the National Institutes of Health (NIH), which aims to build a diverse DNA database by sequencing the genome of more than a million US citizens – have been made possible thanks to NGS approaches. In this article, we will explore the evolution of DNA sequencing methods, and explain how they work.
Table of contents
What is DNA sequencing?
DNA sequencing
DNA sequencing is used to determine the order of nucleotides in a DNA segment, genome, or microbiome. The steps needed to obtain the order of nucleotides depend on the sequencing method chosen, with common techniques including Sanger, Illumina, PacBio and Nanopore sequencing.
History of DNA sequencing
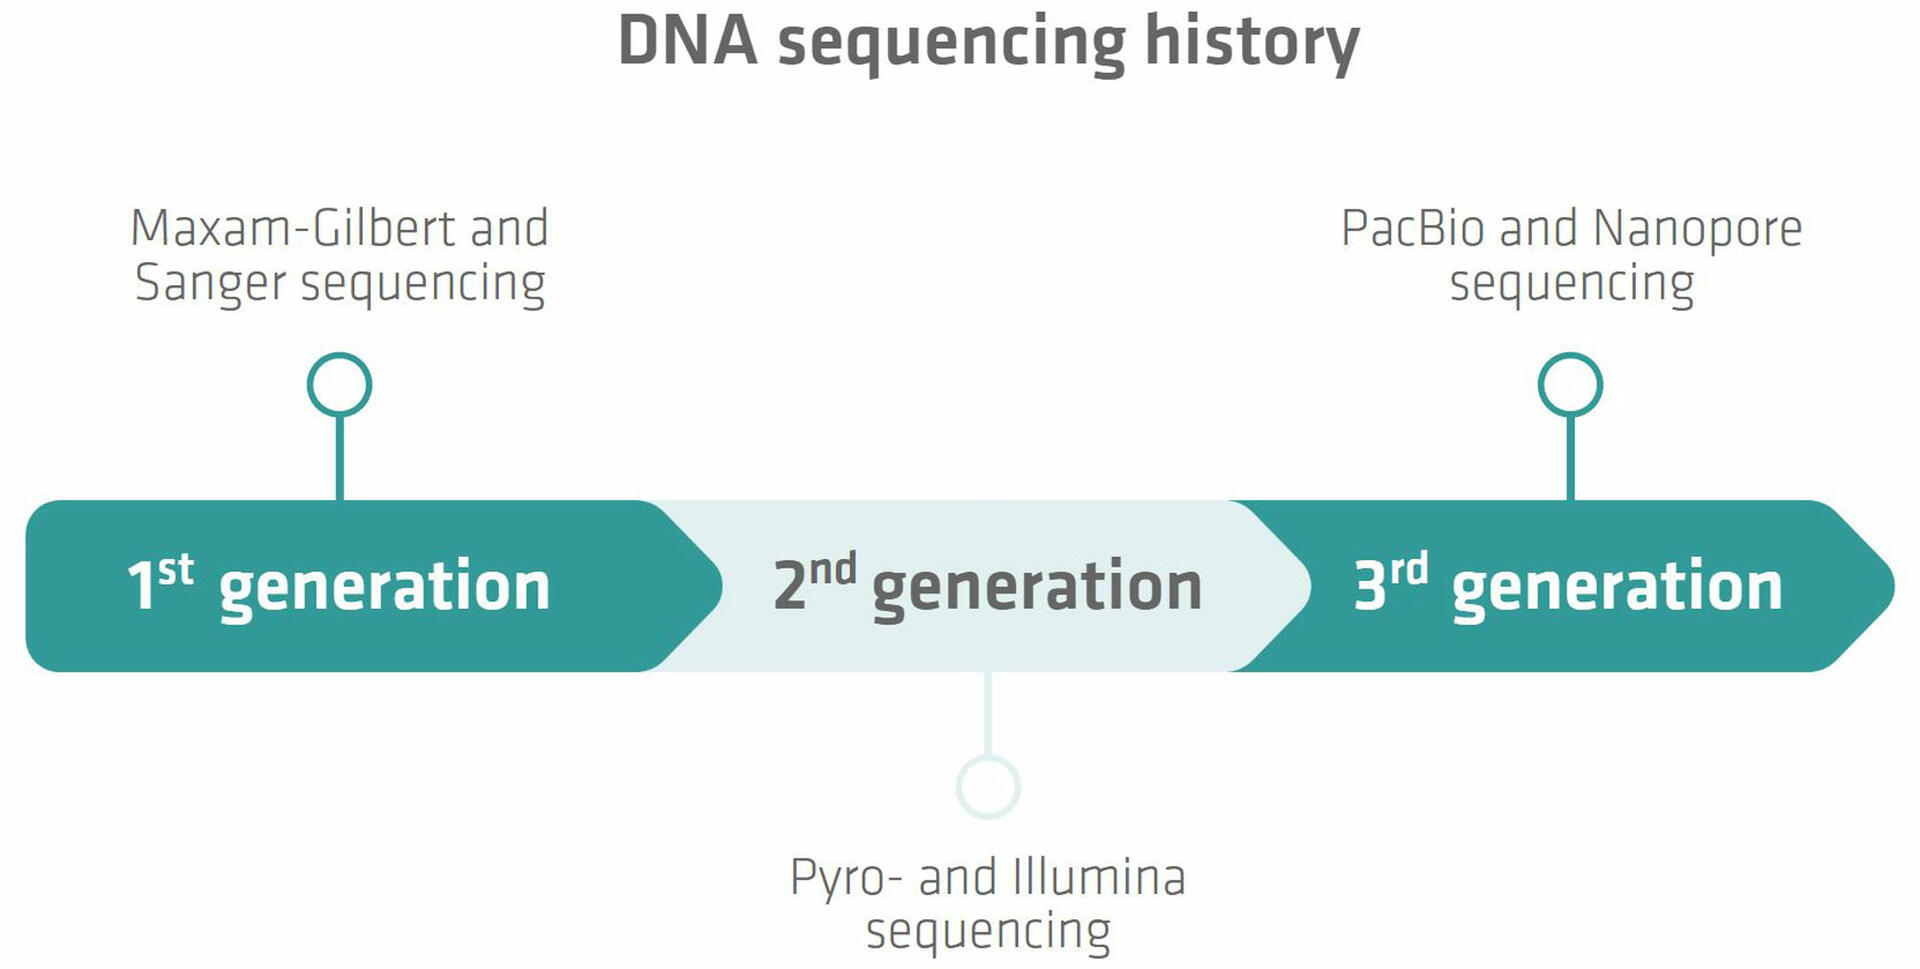
The history of DNA sequencing can be divided into several generations, each characterized by its own techniques and technological advancements.
First generation sequencing
The first major breakthrough in DNA sequencing was achieved in 1977 when two methods – Maxam-Gilbert and Sanger sequencing – were developed.3,4 Sanger sequencing proved to be more accurate, robust and easier to use, so quickly became the most common technology used to sequence DNA, and remained so for many years. The method is also known as chain termination sequencing, and relies on the incorporation of dideoxynucleotides into the DNA strand during replication,5 which is described in more detail below.
Next generation sequencing
Sanger sequencing is still used around the world today, but has been largely superseded by next generation or high throughput sequencing techniques, which can be divided further into second and third generation methods.
Second generation sequencing
The second generation of DNA sequencing began with the introduction of pyrosequencing by a group from the Royal Institute of Technology in Stockholm, Sweden, in the late 1990s.6 Pyrosequencing is based on the detection of pyrophosphate release during DNA synthesis.7 It was the first NGS technology to be commercialized with the introduction of a sequencer by 454 Life Sciences in 2005.6 Today the technology has been largely replaced by more advanced NGS methods that offer a higher throughput.8 One of these techniques is Illumina sequencing. It is based on the use of reversible terminator-bound dNTPs that are incorporated into the DNA during synthesis,9 and has undergone several improvements since the launch of the first sequencing machine in 2007.10 Nowadays, Illumina sequencing is the most widely used NGS technology.11
Third generation sequencing
As we'll see below, Illumina sequencing requires a DNA amplification step, which has several disadvantages. Different research groups have therefore explored real-time, single-molecule sequencing, leading to the introduction of the two third generation sequencing techniques from Pacific Biosciences (PacBio) and Oxford Nanopore Technologies (ONT).11 PacBio sequencing monitors the incorporation of nucleotides by a polymerase enzyme in real-time,11 whereas Nanopore sequencing uses nanopores embedded in lipid membranes. When single-stranded DNA (ssDNA) molecules pass through these pores, electrical signals that vary depending on the base sequence of the molecules can be detected.12
DNA sequencing methods
As seen above, several DNA sequencing methods have been developed over the course of the last few decades. The three market leaders in DNA sequencing today are Illumina, PacBio and Nanopore. In this section, we will explain how their techniques work, after having a closer look at the Sanger and pyrosequencing methods that were developed earlier.
Sanger sequencing
Sanger sequencing was invented in 1977, and remained the main DNA sequencing method until the 21st century. It is now used less frequently, because other techniques are more affordable and efficient, but it still remains a key method for applications such as sequencing single genes or short fragments.13
What is Sanger sequencing and how does it work?
Sanger sequencing
Sanger sequencing, also called the chain termination method, is a method used to determine the nucleotide sequence of DNA. The basic principle of Sanger sequencing is to synthesize a new strand of DNA complementary to the template strand, while incorporating modified, labeled nucleotides that can terminate the synthesis process. Sanger sequencing can be broken down into three steps: chain termination thermal cycling, size separation and determination of the DNA sequence.
The first step, the chain termination thermal cycling reaction, is very similar to a standard PCR protocol. However, during master mix preparation, you not only need to add dNTPs to your reaction mixture, but also a small concentration of fluorescently labeled ddNTPs. There are two differences between these two components:
- dNTPs have a hydroxyl group (OH) that allows the next nucleotide to be added to it, while ddNTPs do not.
- ddNTPs are labelled with different colored fluorescent dyes for each base.12,14
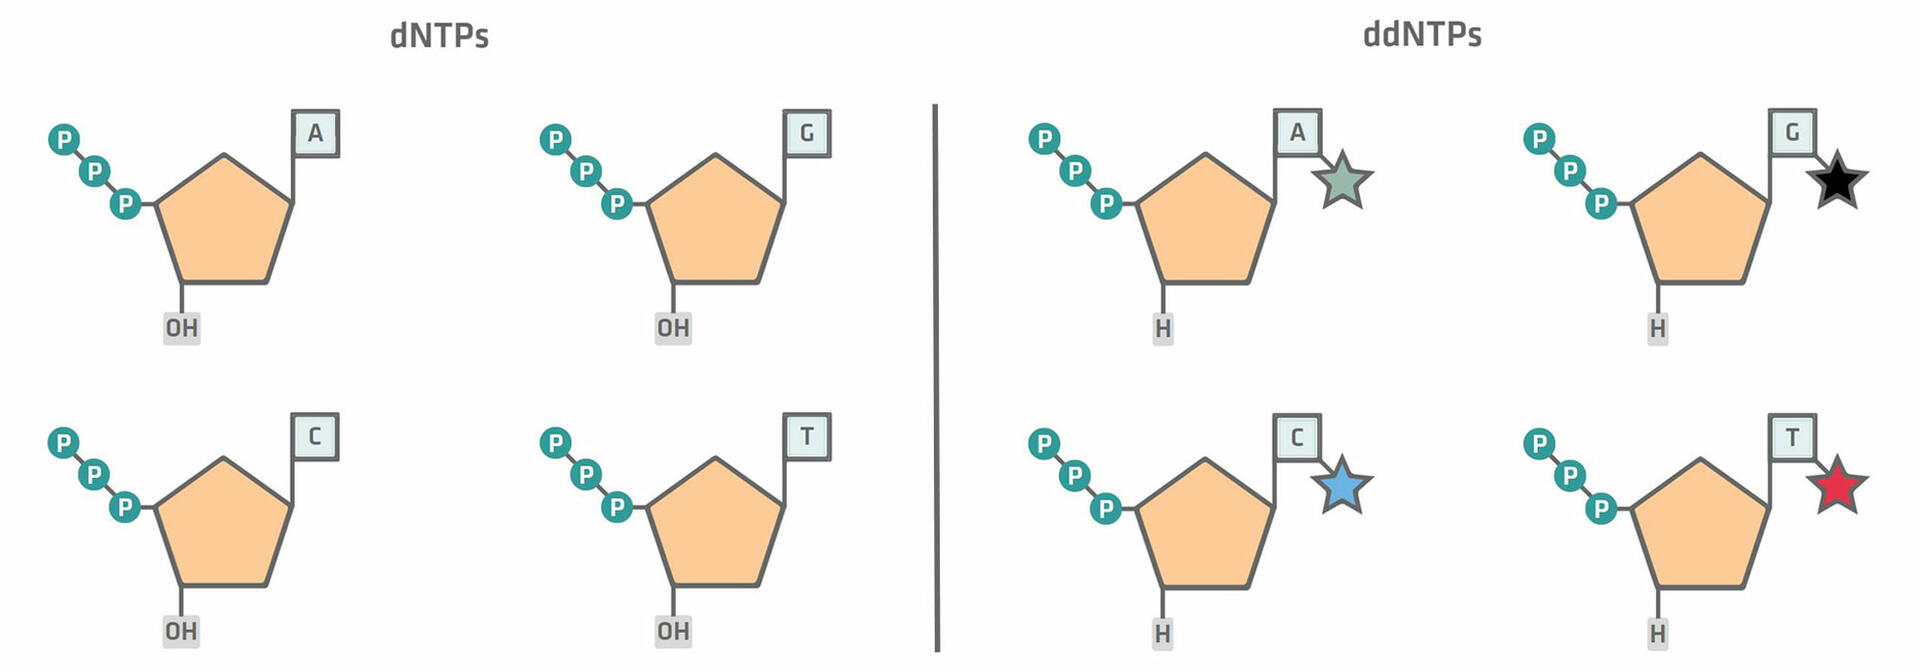
During the extension phase of the chain termination thermal cycling reaction, the DNA polymerase creates complementary copies of the sample DNA, by adding dNTPs until it terminates synthesis by adding a ddNTP. At this point, no additional nucleotides can be added, because of the lack of a hydroxyl group. The incorporation of ddNTPs is random but, as a number of thermal cycles are performed – leading to the creation of billions of templates – it's almost guaranteed that a ddNTP has been added to all the different nucleotide positions at least once.12,14
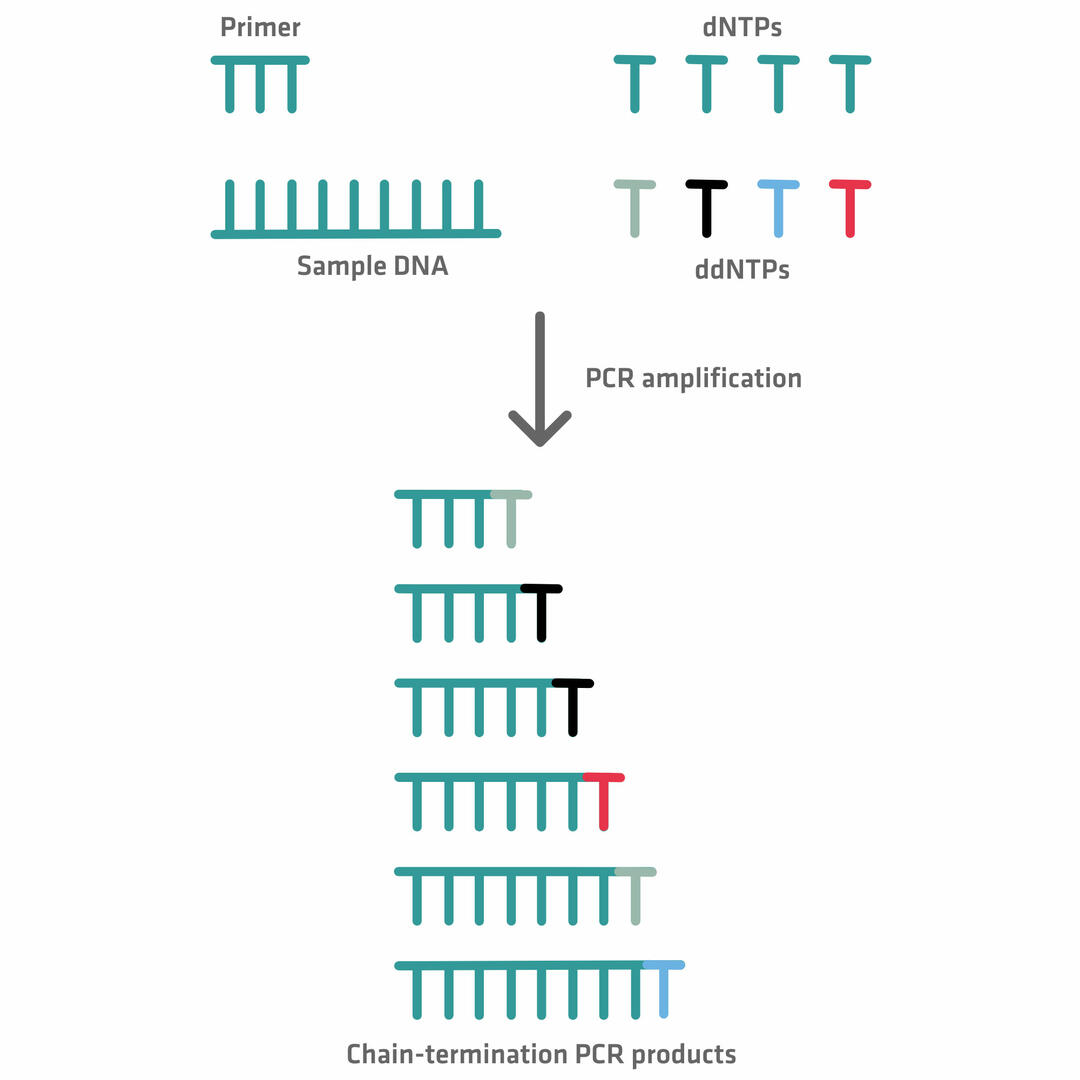
Once the chain termination thermal cycling reaction is finished, the differently sized DNA fragments are run through a capillary containing a gel (polymer). The smaller the DNA fragments, the faster they travel through the pores in the web of the polymer, allowing you to separate them by size. At the end of the capillary, a laser beam and a detector register the color of the dye attached to the ddNTPs in a chromatogram, allowing you to build the sequence of the original DNA sample.14
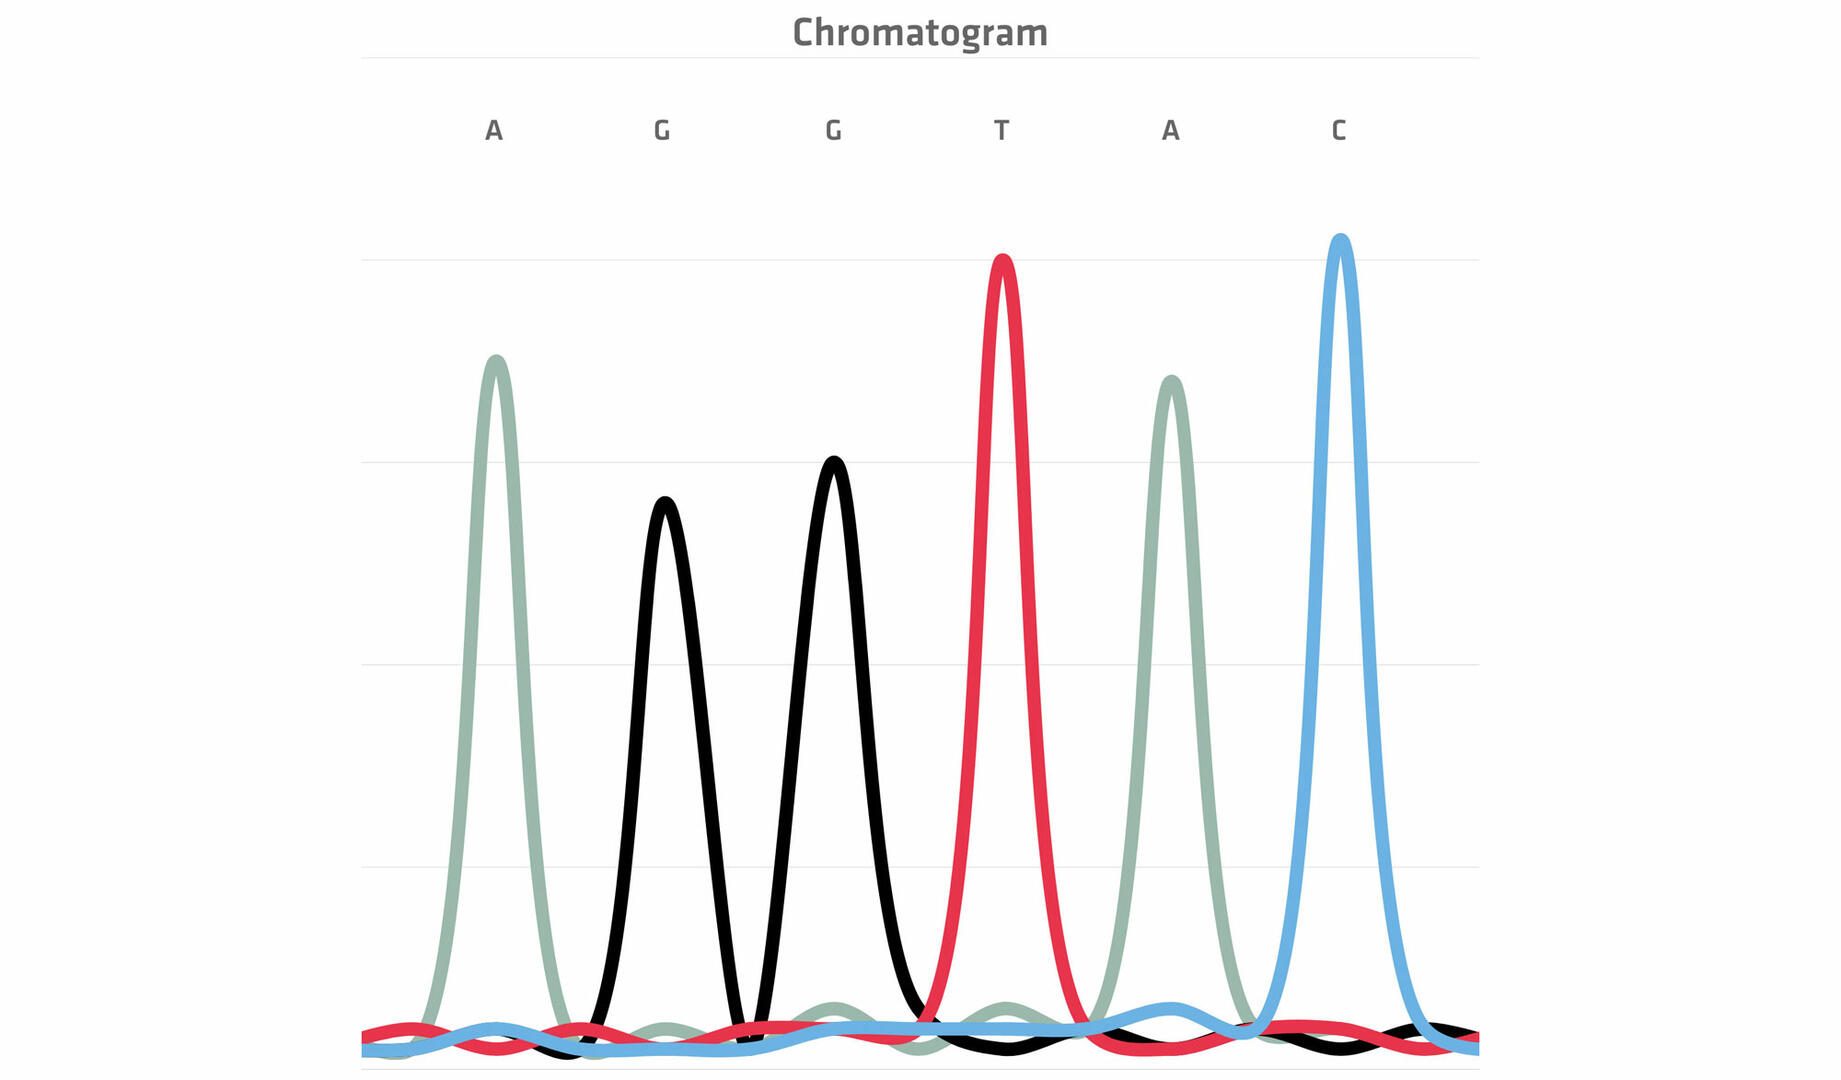
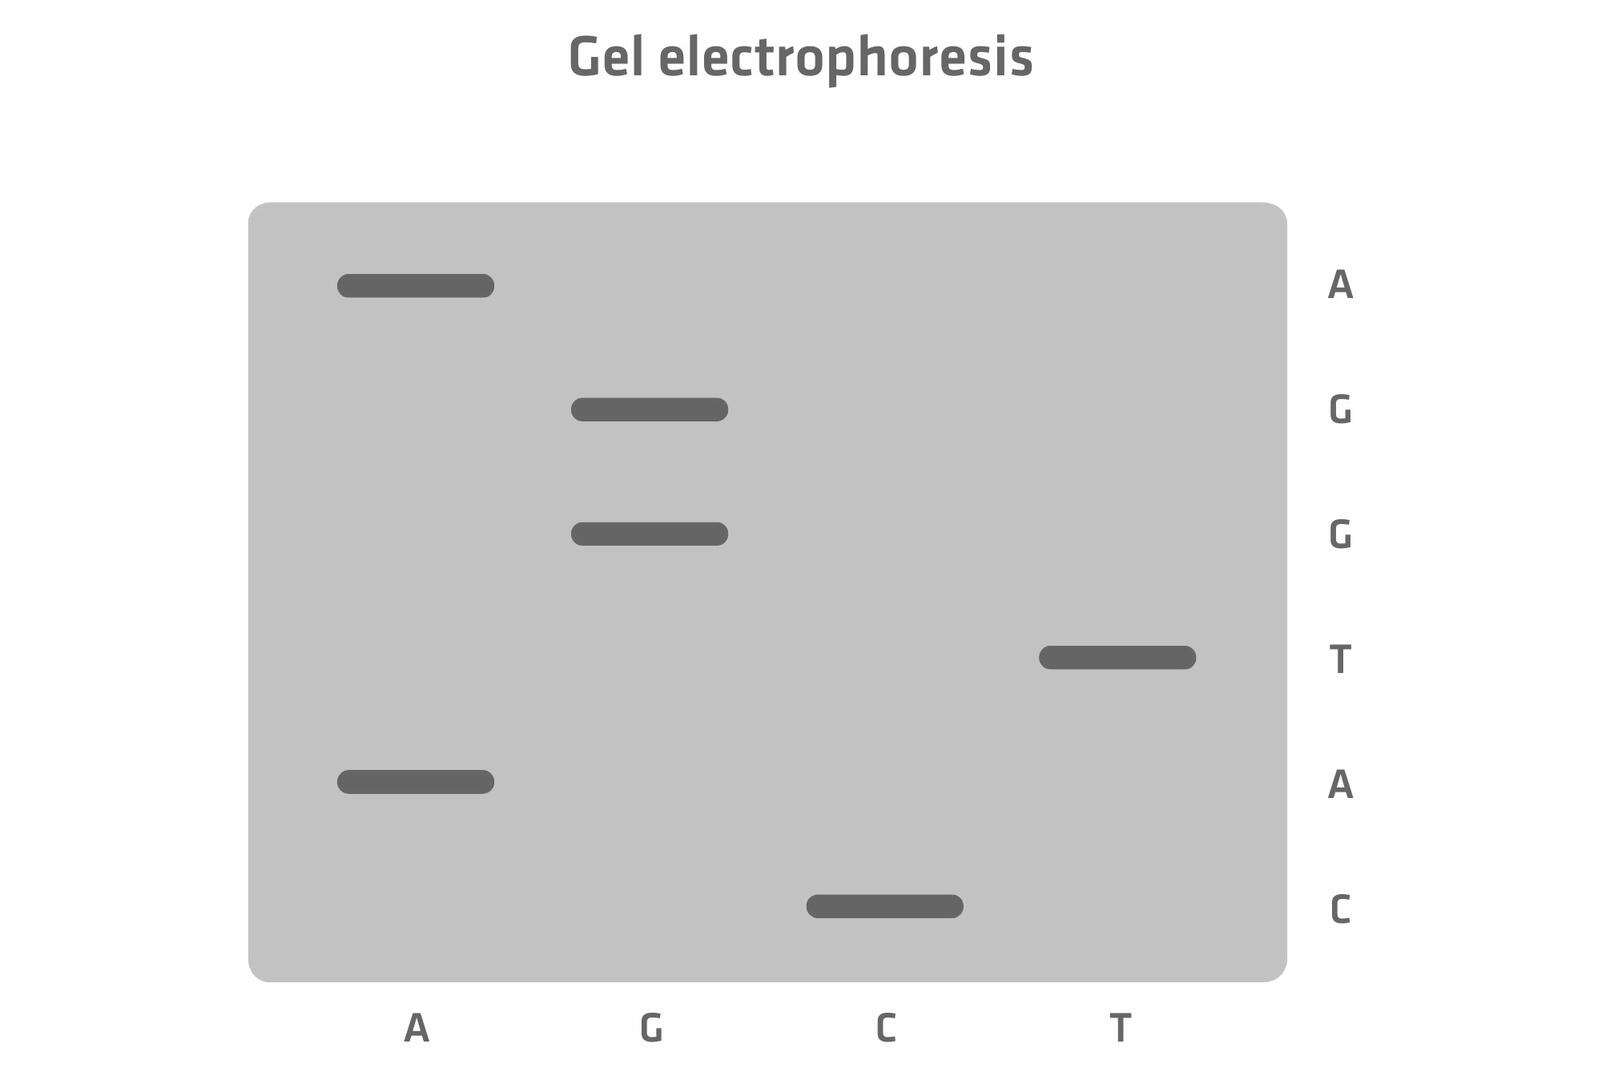
Today, the entire process of size separation and analysis is automated, and software reads the chromatogram for you. However, when the method was developed in the 1970s, the protocol was slightly different. As the four ddNTPs were all labeled with the same radioactive dye, scientists had to perform four chain termination PCR reactions with every sample, adding only one of the four ddNTPs to each tube. The DNA segments of the four reactions were then run in four separate lanes of a gel, and the resulting bands were visualized. This allowed you to manually determine the sequence of the original DNA sample nucleotide by nucleotide.15 For example, in the example image below, the DNA segment travelling furthest produced a band in the lane 'C' which means that the first nucleotide would be cytosine, and so on.
Pyrosequencing
Pyrosequencing was developed about 20 years after Sanger sequencing, and quickly became a standard DNA sequencing method before being replaced by more advanced high throughput techniques. Although the technique is no longer commonly used in laboratories today, we will quickly explain its principle.
What is pyrosequencing and how does it work?
The first step of a pyrosequencing protocol is the PCR amplification of the DNA sequence of interest. One of the primers used for the reaction needs to be biotinylated to allow you to subsequently capture all the forward or reverse strands using streptavidin-coated magnetic beads. These biotinylated ssDNA sequences are then hybridized with sequencing primers.16,17
The next step of a pyrosequencing protocol is the incubation of these ssDNA sequences and sequencing primers with several enzymes and substrates.17 The first of the four dNTPs is then added to the mixture. If the DNA polymerase incorporates one or more of these dNTPs because they match the template strand, pyrophosphate (PPi) is released, resulting in an enzymatic reaction that produces light. This signal can be detected by a charge coupled device (CCD) camera, with the height of the peak proportional to the number of nucleotides incorporated.17
The next step is the addition of an enzyme called apyrase, which degrades unincorporated dNTPs. As soon as this happens, the next dNTP can be added. Once you have sequentially added every dNTP several times, you can determine the nucleotide sequence from the signal peaks.17

Illumina sequencing
A major disadvantage of the pyrosequencing method is that only one dNTP type can be added at a time. This problem was solved by Illumina sequencing.
What is Illumina sequencing and how does it work?
Illumina sequencing
Illumina sequencing is a synthesis method used to sequence millions of DNA fragments in parallel. For a standard Illumina protocol, a library is prepared by fragmenting, purifying and amplifying the DNA sample. The sequence of each of these fragments is then determined simultaneously, and computationally aligned against a 'normal reference' genome.
That's Illumina sequencing in a nutshell. Read on to gain a more detailed understanding of this important sequencing method. If you wish, you can also watch our video explaining how it works.
Standard Illumina sequencing can be split into the following steps:
- DNA fragmentation
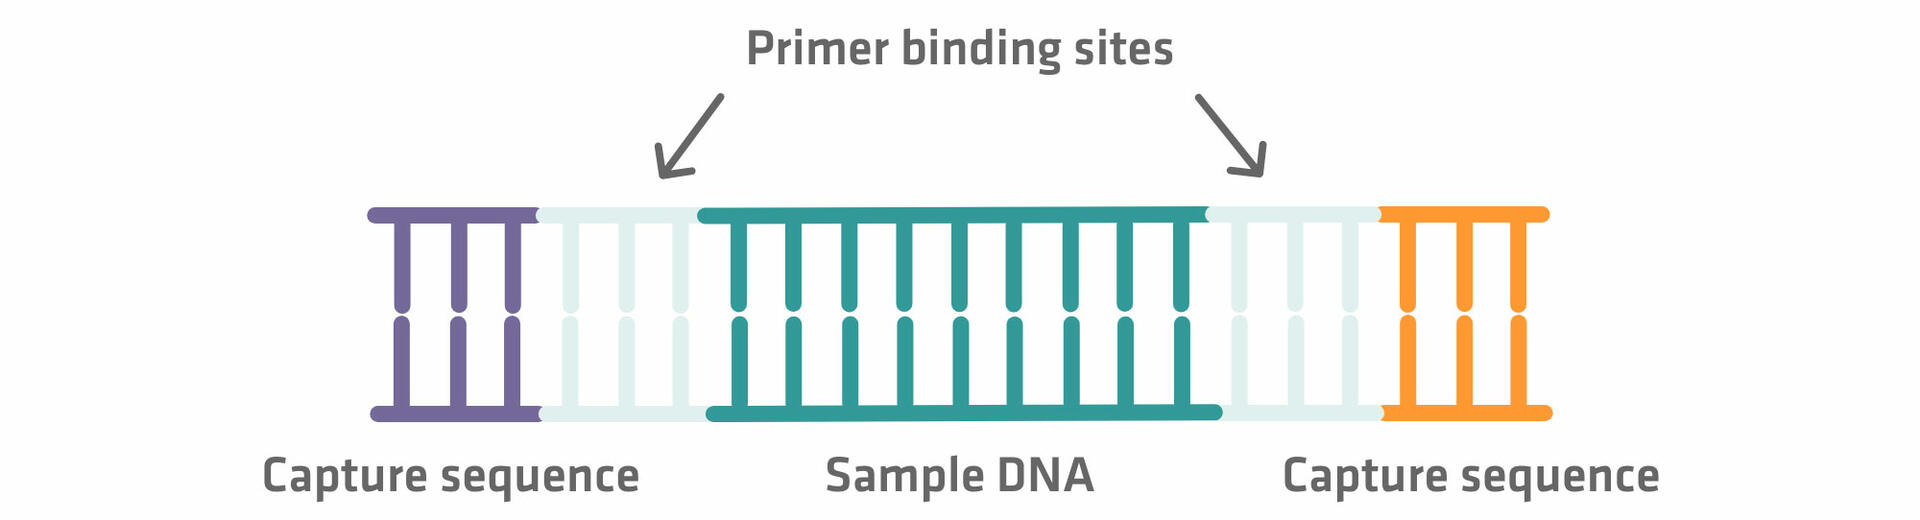
- Addition of primer binding sites and capture sequences
- DNA denaturation
- DNA immobilization
- DNA amplification
- DNA sequencing
The first three steps are commonly referred to as library preparation, and convert the DNA sample into a library of fragments that can be handled by an Illumina sequencing machine. Low throughput labs can either perform these steps manually or use a small automated benchtop device for library preparation, while high throughput labs generally use large liquid handling robots.
Step 1: You first need to fragment your DNA sample into small pieces using either physical or enzymatic fragmentation methods.18
Step 2: The DNA sequences then need to be elongated with adapter sequences on both ends. The inner adapter sequences are primer binding sites that are used for the sequencing reaction later on, and the outer adapter sequences are capture sequences required for the immobilization step.12 As the adapter sequences are added using enzymatic reactions – where reagents, adapter sequences and enzymes are added in excess – subsequent purification steps are needed to separate the DNA fragments from unused reaction components. If you'd like to learn more about DNA purification methods, please refer to our blog post on DNA purification methods or check out our application note on NGS size selection.
Step 3: Once you have added the adapter sequences to your sample, denature the sequences to separate the two strands from one another.12
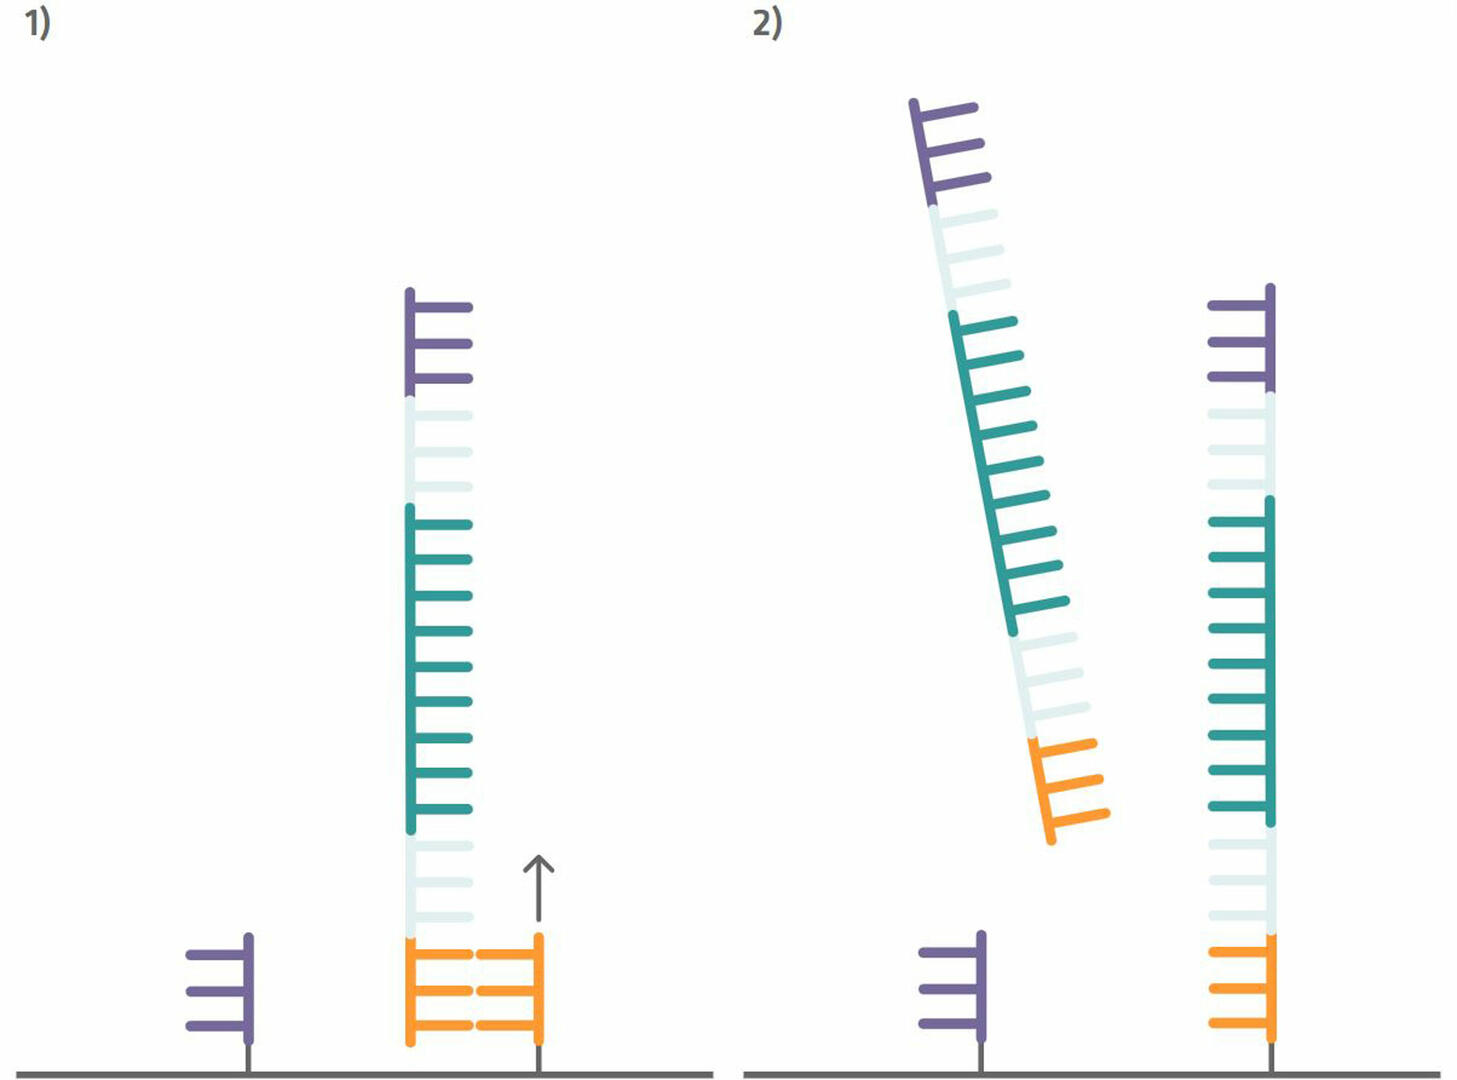
Step 4: Your sample can then be added to the Illumina flow cell. The flow cell is pre-spotted with short DNA sequences (oligonucleotides or oligos) that are complementary to the capture sequences attached to your DNA sample, and consequently bind your sample sequences. Once your sample sequences are attached to the flow cell, you can perform a single PCR cycle to copy them (step 1 in the image below). After this step, denature the sequences and wash out the sample DNA strands to be left with newly synthesized strands that are immobilized to the flow cell (step 2 in the image below).12
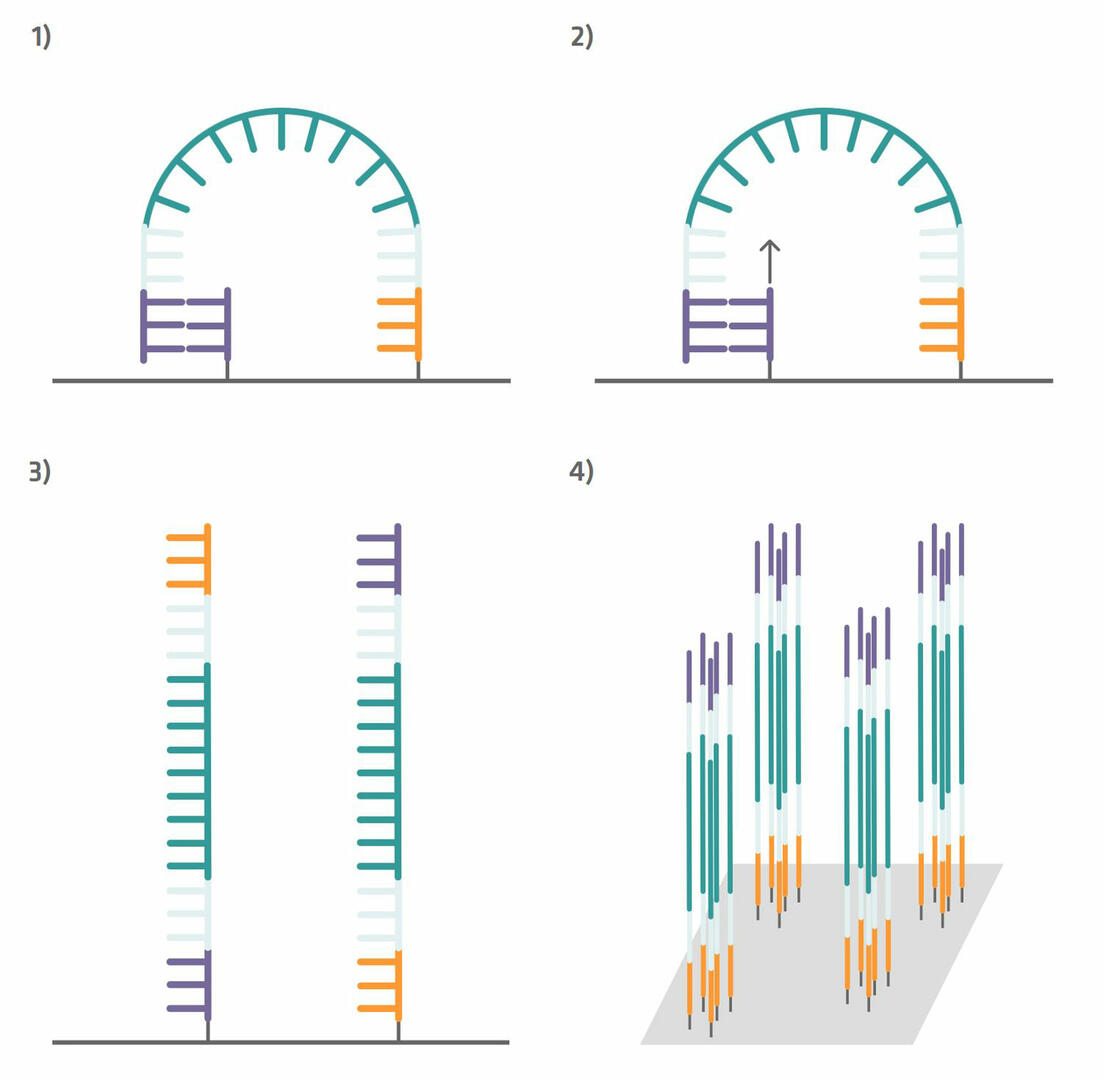
Step 5: These immobilized sequences need to be amplified before DNA sequencing, a step that is also referred to as cluster generation. To do this, perform several PCR cycles. The capture sequences on the flow cell are used as primers. This means that the immobilized sequences form a bridge to anneal to them during the annealing phase (step 1 in the image below). During the extension phase, the bridge is copied (step 2 in the image below) and, during the denaturation phase, the two sequences separate from one another (step 3 in the image below). Once you have about a thousand copies of each sequence in a cluster, cleave off one of the primers to ensure that you are left with only the forward or reverse strands (step 4 in the image below).12
Step 6: The sequencing process can now begin. Add a sequencing primer complementary to the primer binding site adapter on to the flow cell (step 1 in the image below). The sequencing process that then follows is similar to Sanger sequencing. A polymerase enzyme copies the template strand and adds in the first base. As this base lacks a hydroxyl group, the reaction stops, giving you time to take four images – one for green, one for black, one for blue and one for red – to determine which base was added (step 2 in the image below). In contrast to Sanger sequencing, however, the missing hydroxyl group can subsequently be regenerated with chemicals. These chemicals also remove the fluorescent dye from the base that was incorporated (step 3 in the image below). As soon as the hydroxyl group has been regenerated, the polymerase enzyme adds the next base (step 4 in the image below), and the next imaging and hydroxyl group regeneration steps can take place.12

Please note that you can sequence several samples in parallel using a single flow cell. However, if you want to perform a multiplexed assay, index sequences need to be added in between the primer binding sites and capture sequences during library preparation. These index sequences can be used as ‘barcodes’, so that each fragment can be identified and sorted after amplification and sequencing.19
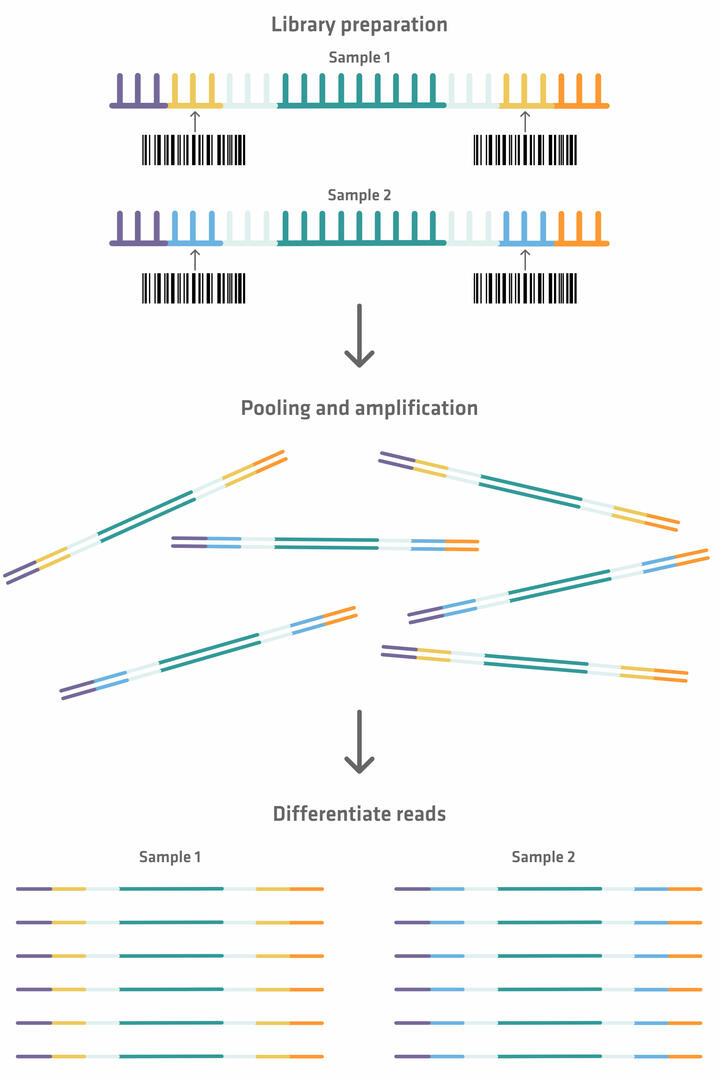
You need to normalize the samples before pooling them, to ensure that they all have the same DNA concentration. If you'd like to learn more about how this process can be automated to avoid the error-prone process of manually diluting every sample with the appropriate amount of diluent, check out our application note DNA library normalization with the ASSIST PLUS pipetting robot.
PacBio sequencing
Illumina sequencing includes a template amplification step that has several downsides, such as copying errors, and added time and complexity. PacBio sequencing, which allows for single-molecule real-time sequencing, has been developed to solve these issues.11
What is PacBio sequencing and how does it work?
PacBio sequencing, also called SMRT (single-molecule real-time) sequencing,20 monitors the incorporation of nucleotides by a polymerase enzyme in real time.11
Library preparation for PacBio sequencing is quick and easy to perform, as a PCR reaction is not needed. All you need to do is ligate adapter sequences to the double stranded template DNA fragments that you want to sequence. This allows you to get a SMRTbell library with circular DNA templates. Primers and polymerase enzymes that bind to the adapter sequences can then be added, and the polymerase enzymes can be immobilized to tiny wells called zero-mode waveguides (ZMWs) using magnetic beads, for example.20,21
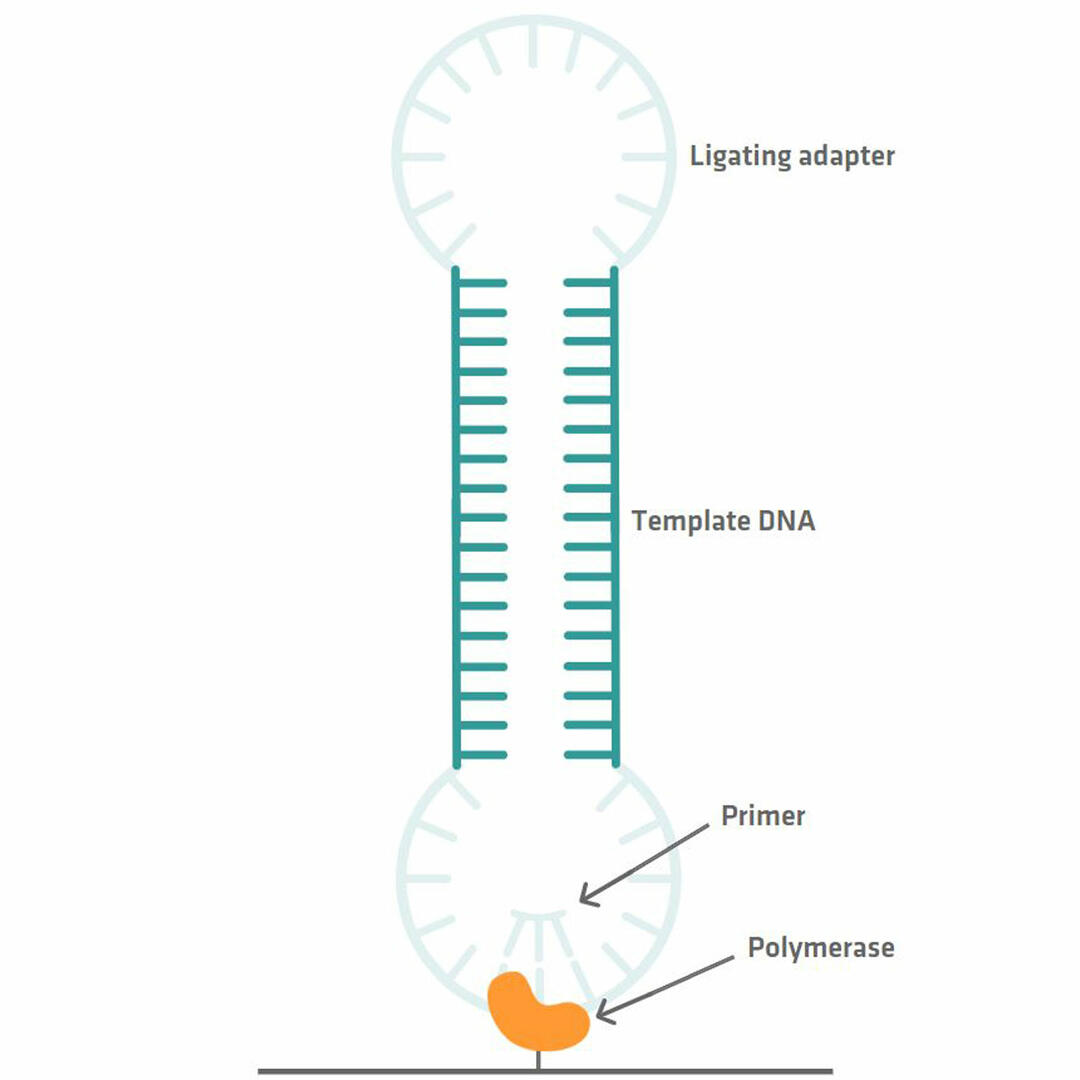
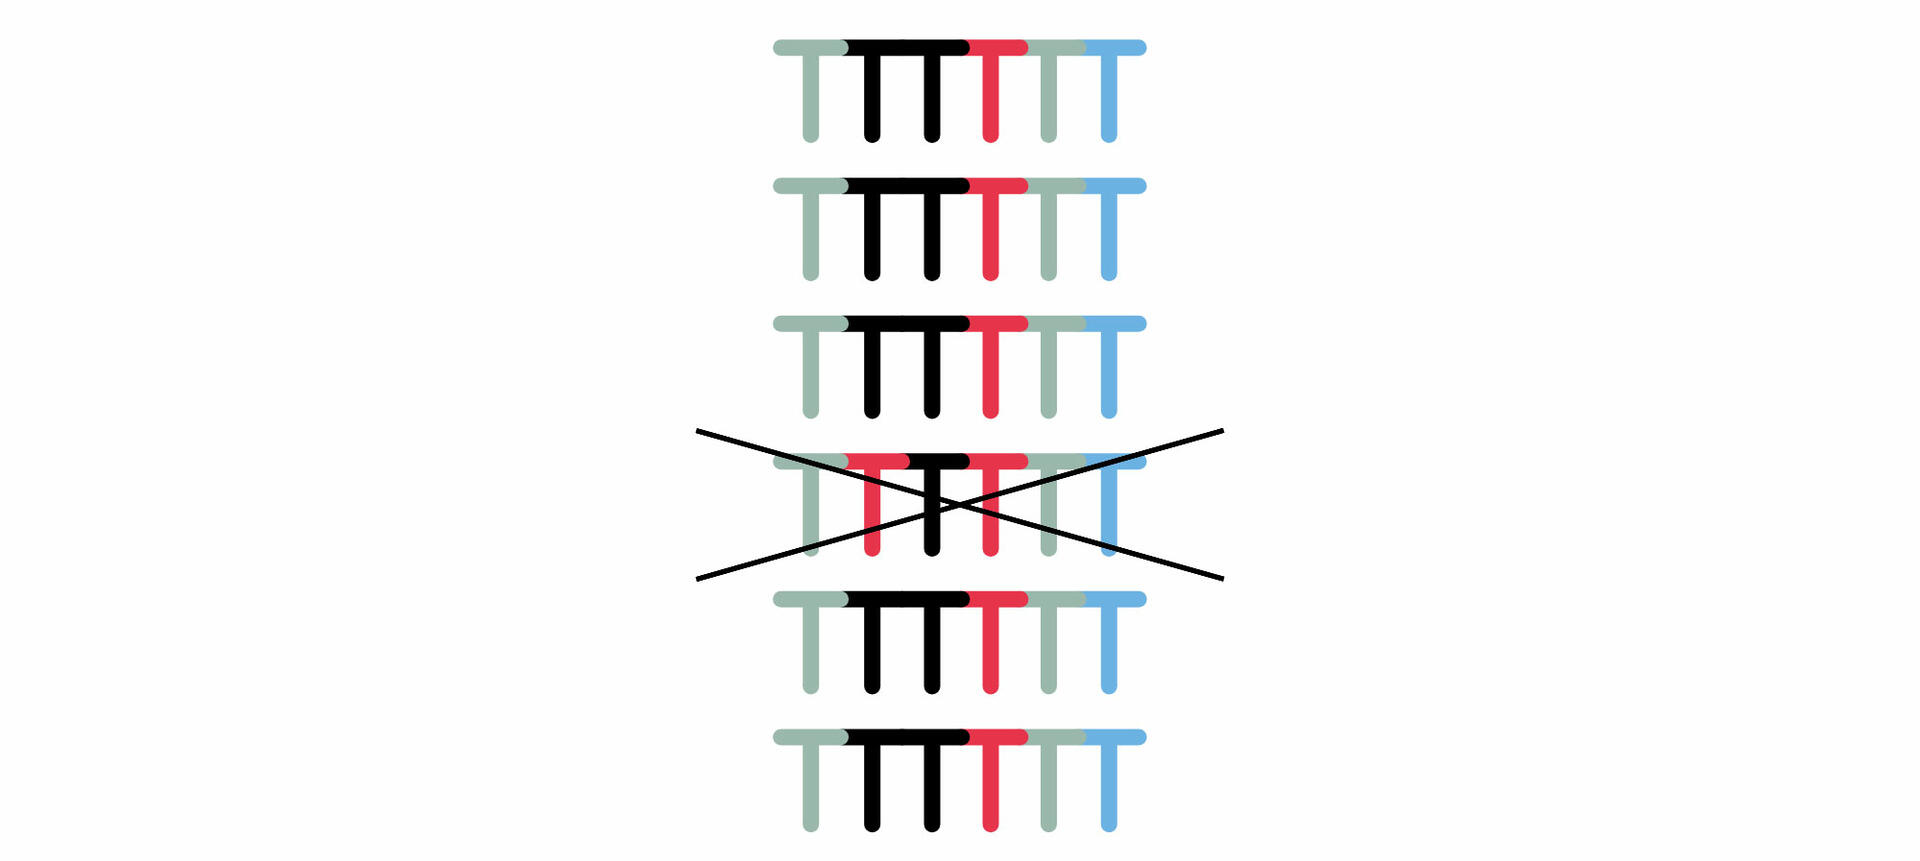
Millions of these ZMWs form a SMRT cell that needs to be inserted into a PacBio sequencing system for analysis.20 Within the instrument, a camera monitors the incorporation of fluorescently labeled bases by the DNA polymerase. As each base is labelled with a different dye, the wavelength of the signal that is emitted when the nucleotide is incorporated allows you to determine the sequence of your template DNA. However, because the polymerase enzyme sometimes incorporates a wrong base, you should allow it to read the circular DNA sequence several times, so that you can compare the different reads with each other and eliminate errors.12
Nanopore sequencing
A second DNA sequencing method allowing for single-molecule real-time sequencing is the Nanopore technology. What is striking when you look at a Nanopore sequencers is their size. The smallest device is about as small as a remote control, and can therefore be taken into the field.12 If you are now wondering how such a small machine can sequence DNA, you are in the right place.
What is Nanopore sequencing and how does it work?
In contrast to all the other sequencing methods discussed so far, Nanopore sequencing doesn't use polymerase enzymes and labeled bases but – as the name suggests – nanopores and electric currents. But let's first have a look at library preparation.
Before pipetting your sample into the sequencer, you need to add adapter sequences that will allow the binding of a motor protein to your DNA fragments.22 This DNA library can then be added to the sequencing device that contains a flow cell with an array of tiny holes – nanopores – embedded in an electro-resistant lipid membrane. As a constant voltage is applied to the flow cell, an electric current travels through the pores, threading negatively charged DNA through them.12,23 The motor protein is needed to unwind the DNA before it passes the pore, and also controls the speed, ensuring that the DNA molecule travels through the pore step-by-step or base-by-base.23 As the DNA disrupts the electric current in a specific manner depending on its base sequence, this will allow you to determine the nucleotide sequence of your DNA, depending on the current that's read by detectors.12 Please note that Nanopore sequencing is, so far, the only technology that can also be used to directly sequence RNA.
Conclusion
A lot has happened in the field of DNA sequencing since the invention of Sanger sequencing in 1977 and the launch of the Human Genome Project in 1990. While it took us 13 years and $2.7 billion to sequence the first human genome, this process could be completed within 48 hours today, and for only $600.2,12 This is only possible thanks to numerous scientific advances, and we hope that this article was able to give you a good overview of the different DNA sequencing methods over time, as well as their mechanisms.
Further reading: eBook: Everything you need to know about NGS
Ask our expert. Leave a comment!
Write us if you have any questions regarding the blog article.