How to do serial dilutions (including calculations)
Written by Anina Werner
16. February 2023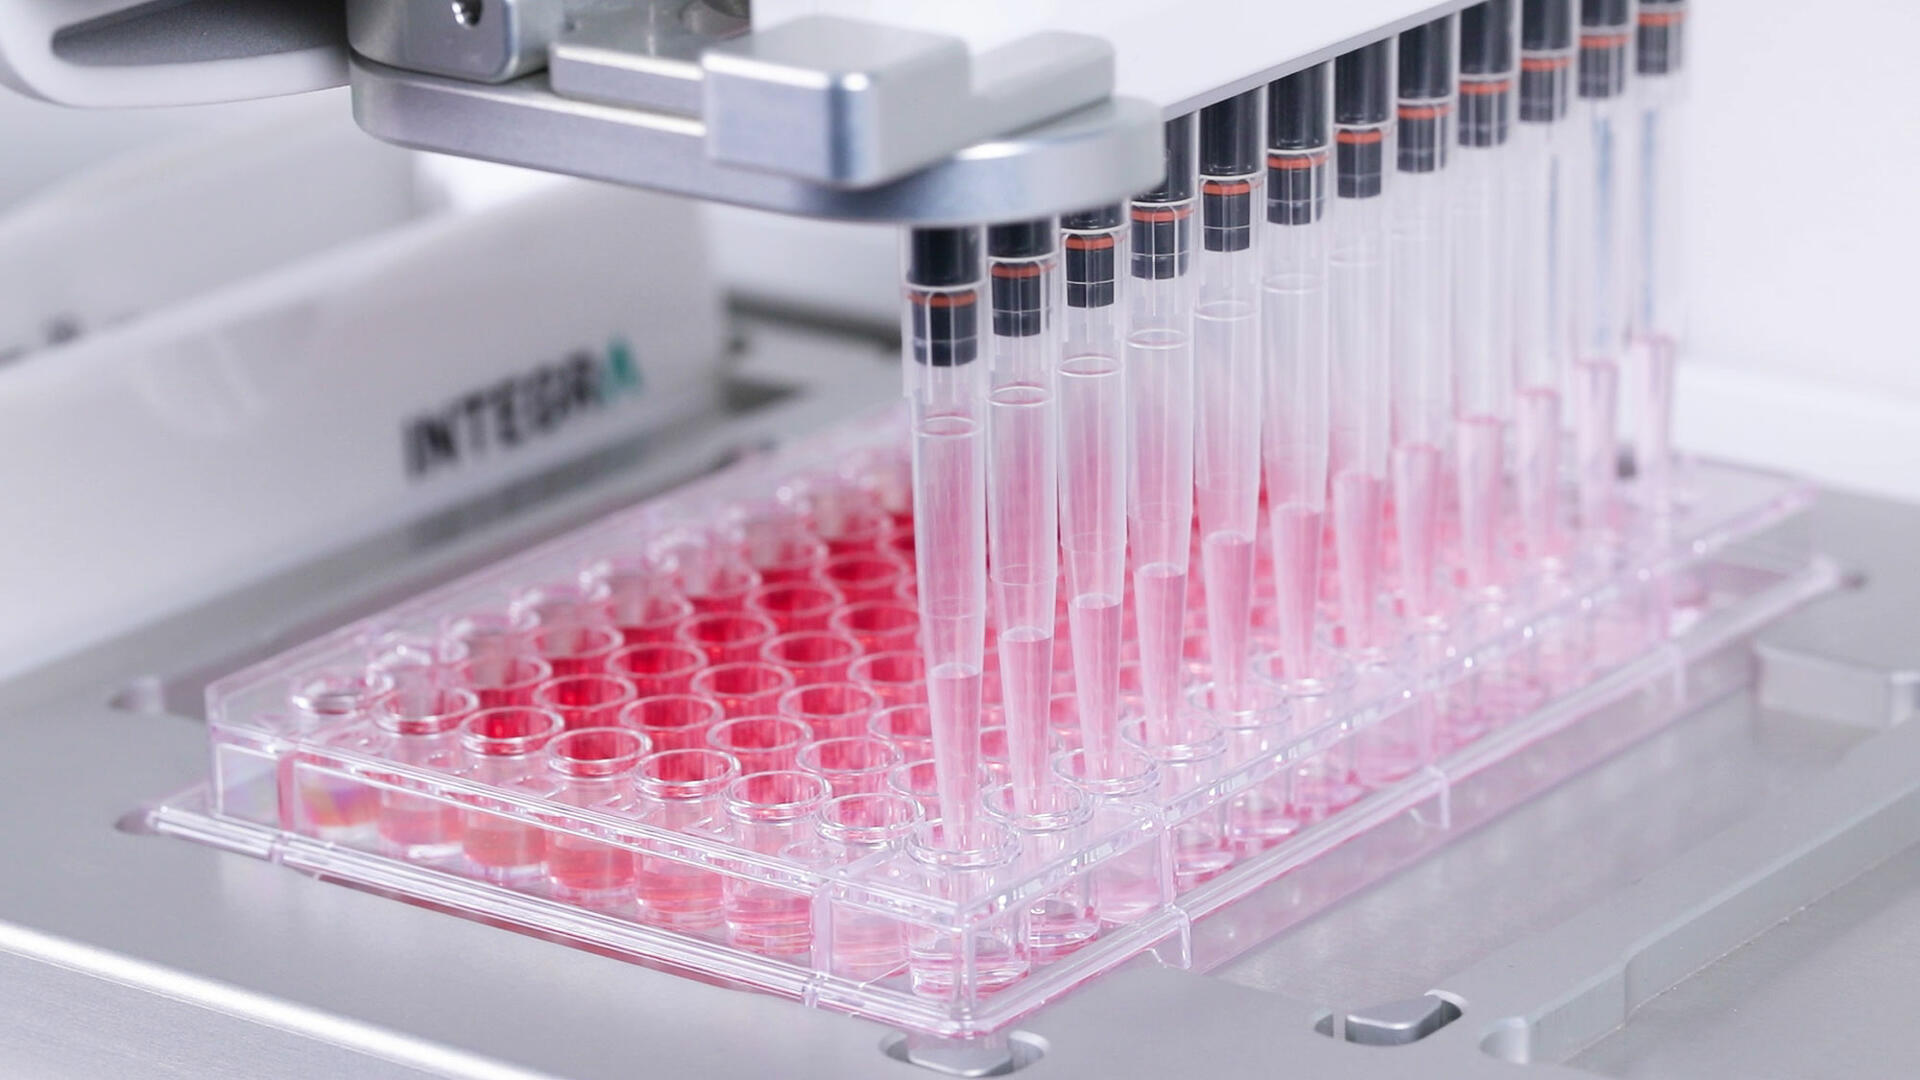
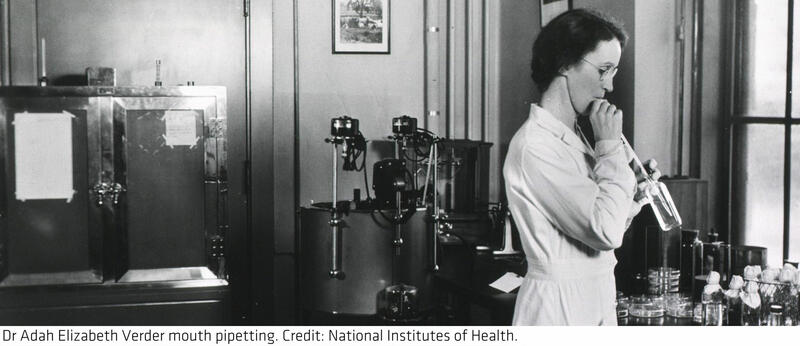
The serial dilution method was first described in 1883 by German scientist and physician Robert Koch when he published his work on infectious disease-causing agents,1 and is now a standard technique in today's laboratories. This article describes what a serial dilution is, provides examples of common applications, and explains how to perform a serial dilution, as well as highlighting the technique's limitations.
Table of contents
Definition of serial dilution
Let's start by briefly defining what a serial dilution is:
Serial dilution
A serial dilution is a step-wise series of dilutions, where the dilution factor stays the same for each step. The purpose of a serial dilution is to estimate the concentration of a sample, or to obtain the desired concentration of a reagent, chemical or compound.
If you wish, you can also watch our video explaining serial dilutions in more detail.
Serial dilution examples
As the concentration of samples, reagents, chemicals and compounds play important roles in almost every lab, serial dilutions can be considered a standard laboratory technique with endless applications. Below, we've outlined examples of common serial dilution workflows in the fields of microbiology and pharmacology, as well as a more general example.
Microbiology
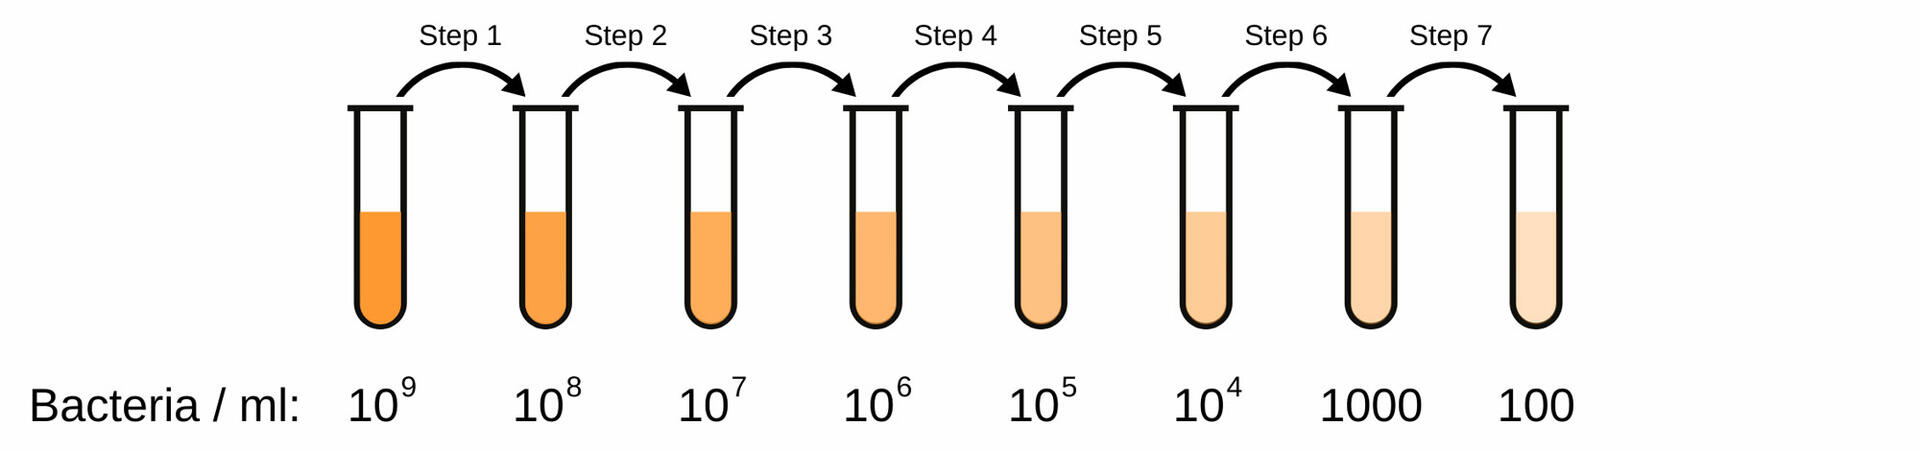
Serial dilutions are routinely used in microbiology to estimate the number of microorganisms in a sample with an unknown concentration. Imagine that you have a bacterial culture tube, and want to know how many bacterial cells are growing in it. As every milliliter of media could contain a billion bacteria, it is impossible to count them in such high concentrations. This is why you have to dilute a small portion of your bacterial culture until you get a more easily countable concentration of 30 to 300 bacterial cells per milliliter. However, in order to get to such a low concentration from a sample with one billion bacteria per milliliter in one step, you would need to dilute one milliliter of the sample in 10,000 liters of diluent.2 An alternative and more practicable approach is to perform a serial dilution. After diluting one milliliter of the sample with one billion bacterial cells per milliliter in nine milliliters of diluent, you will get a concentration of one hundred million bacterial cells per milliliter (Figure 1, Step 1). Diluting one milliliter of this dilution in nine milliliters of diluent will allow you to obtain a bacterial concentration of ten million cells per milliliter (Figure 1, Step 2), and so on. This means that you will get to a manageable concentration of 100 bacterial cells per milliliter in 7 dilution steps, using only 63 milliliters of diluent.
The method in the example above works well if want to dilute a highly concentrated sample until you get a more manageable concentration. However, sometimes you may want to work the other way around. When testing water sources for coliform bacteria contamination, for example, bacterial concentrations are usually very low. In this case, the most probable number (MPN) method is the technique to choose to estimate the number of bacterial cells in a sample. If you'd like to learn more about the MPN method, check out our application note Rapid and precise dilutions for the most probable number test procedure with DOSE IT.
Pharmacology
In pharmacology, serial dilutions are commonly used to determine the required concentration of a compound.

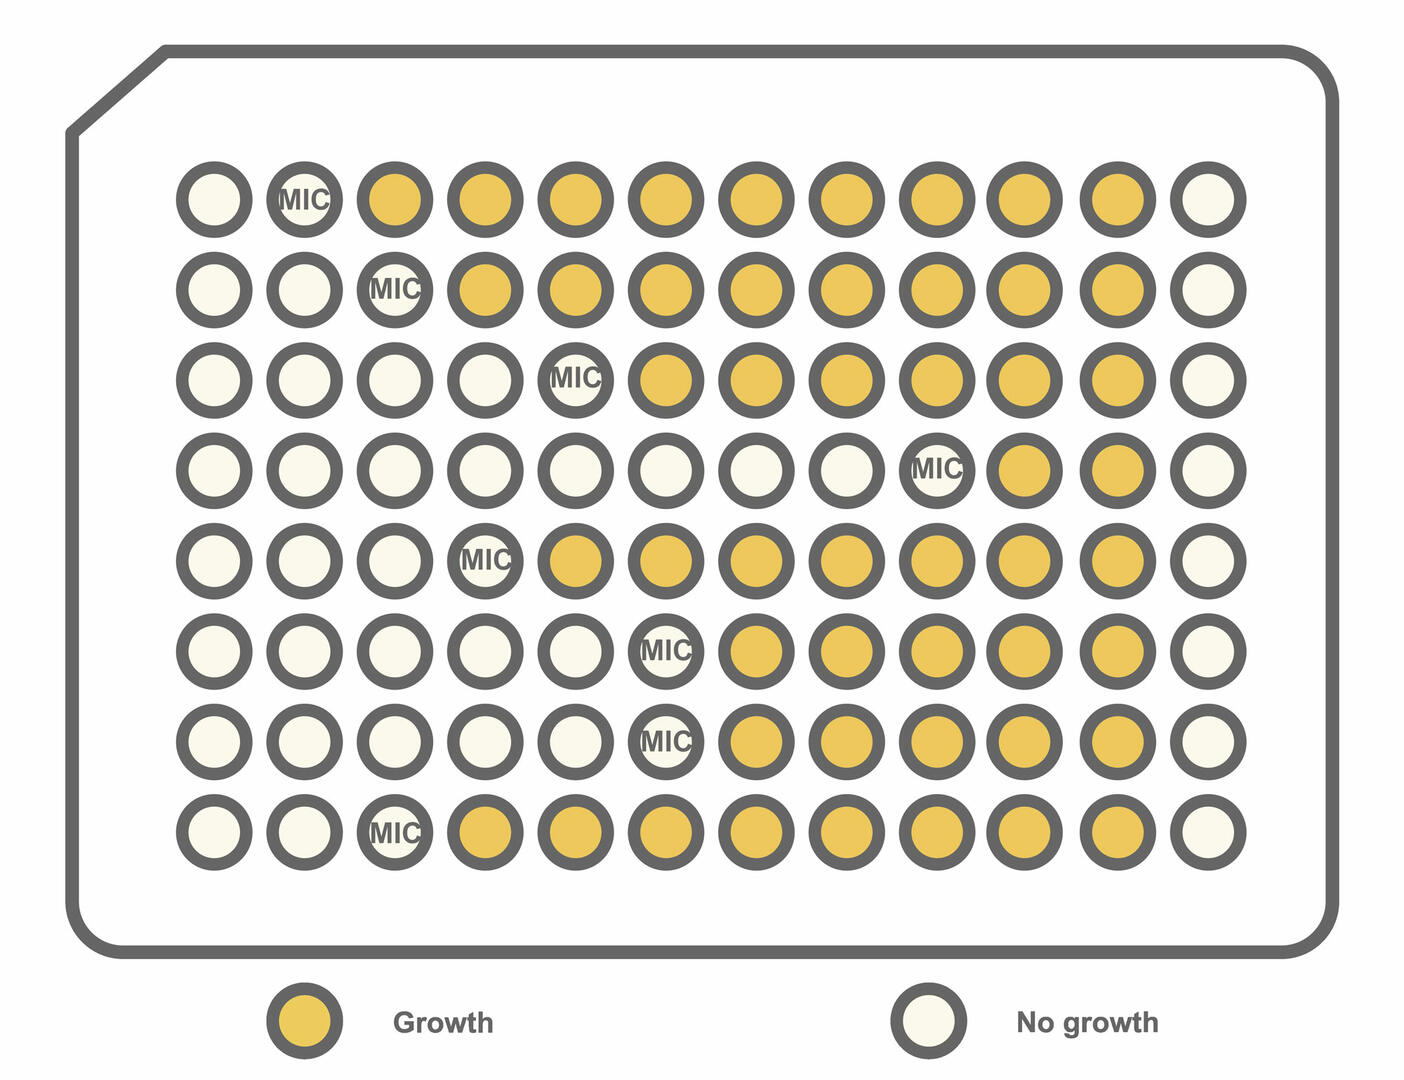
For example, let's assume that you want to determine the efficacy of several new antimicrobial drug candidates. A common way to do this is to determine the minimum inhibitory concentration (MIC) – defined as the lowest compound concentration needed to inhibit the growth of the pathogen – for every candidate. To this end, you first set up a serial dilution of the compounds in liquid growth medium, then inoculate every compound-medium mixture with the pathogen before incubating. Measuring the microbial growth after incubation will allow you to determine the lowest effective concentration of each compound. For more information on MIC testing, please refer to our application note Automated minimum inhibitory concentration testing.
Standard curves
A third common application of serial dilutions is to set up standard curves. For example, when performing qPCR assays or quantifying nucleic acids by fluorometry, you need to perform a serial dilution of a sample with a known amount of template DNA. Comparing the fluorescent signals of the standard curve samples to your samples with an unknown nucleic acid concentration will allow you to quantify the amount of DNA present in your samples.
Serial dilution methods
The ratio of sample, reagent, chemical or compound to diluent is defined as the dilution factor. Widely used dilution factors are two and ten, which is why we often talk about 2-fold and 10-fold serial dilution methods. We'll explain the two techniques – and when to use them – in the next sections, but you can choose any dilution factor if it is more convenient for your experiment.
10-fold serial dilution
In the first example above, we wanted to dilute a sample with an incredibly high bacterial concentration to an easily countable number of bacterial cells, so diluted 1 ml of the original sample – or previous dilution – in 9 ml of fresh diluent. This means that our dilution factor was ten, and we performed a 10-fold serial dilution. This method is commonly used if you want to get from a very high concentration to a much lower concentration in as few steps as possible.
2-fold serial dilution
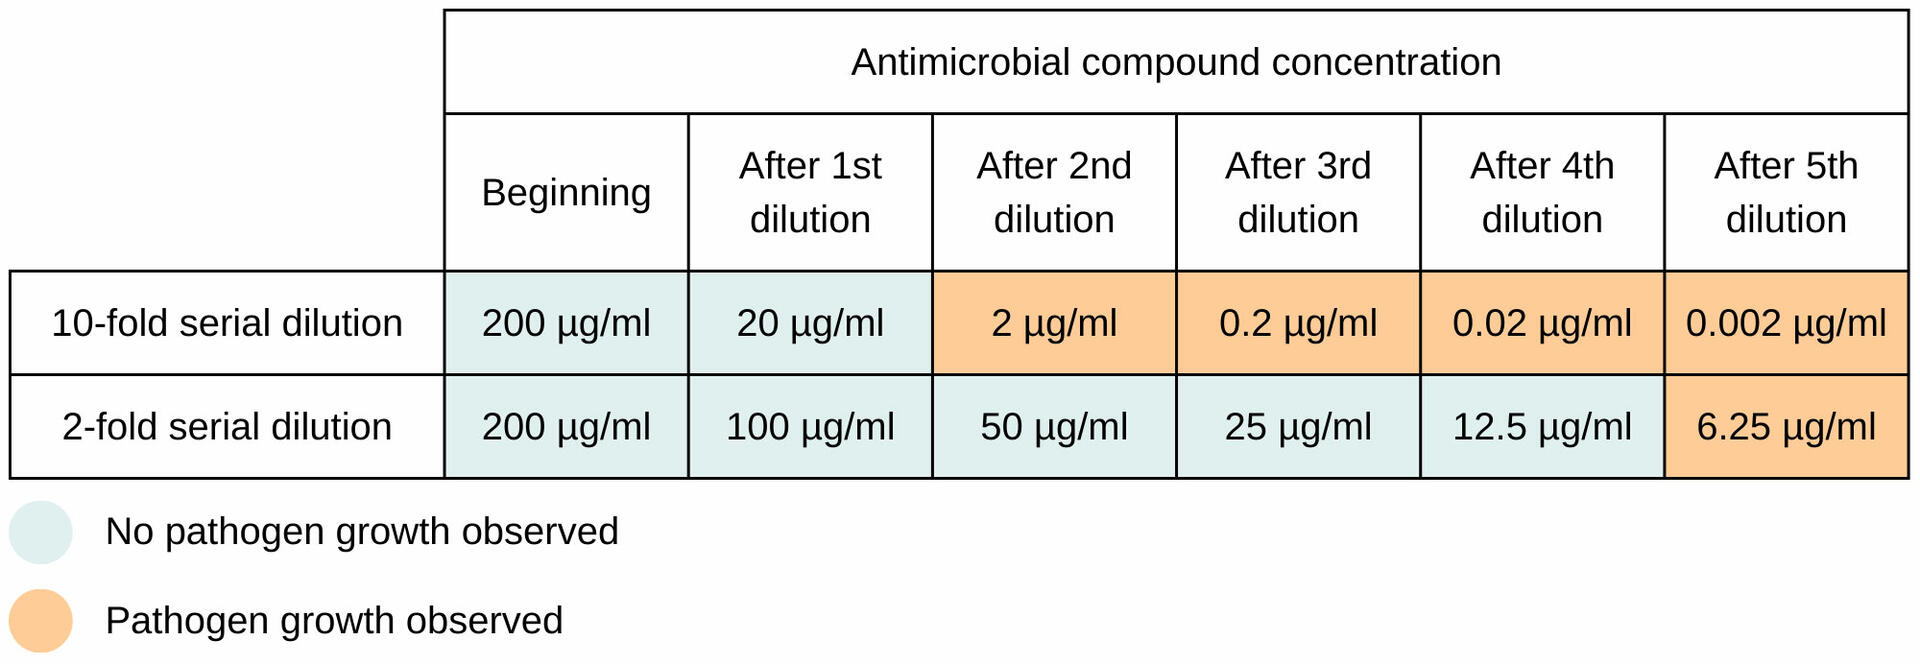
In the second example described above, we wanted to find out if candidate antimicrobial compounds were effective against a certain pathogen. To this end, we wanted to determine the minimum concentration required to inhibit the growth of the pathogen. For this experiment, we would probably set up a 2-fold serial dilution, mixing a certain volume of the compound – or previous dilution – with the same volume of fresh diluent. The advantage of this approach compared to the 10-fold serial dilution is that the MIC values are more precise. Let's assume that the compound inhibits the growth of the pathogen at a concentration of 10 µg/ml. If you start with an initial compound concentration of 200 µg/ml, and set up both 10-fold and 2-fold serial dilutions, you would get a minimum inhibitory concentration of 20 µg/ml from the 10-fold serial dilution experiment and 12.5 µg/ml from the 2-fold serial dilution method, as shown in this table:
Another option to get a value that is as precise as possible is to start with a 10-fold serial dilution to determine the approximate compound concentration needed to inhibit pathogen growth, and subsequently perform a 2-fold serial dilution focusing on the range between 20 and 2 µg/ml.
The steps of a serial dilution
While the possible applications of serial dilutions are very varied, the method itself always follows the exact same steps:
- Determine the diluent: First of all, you need to choose the proper diluent for the substance that you want to dilute. Many compounds can be mixed with distilled water, but for bacteria or cells, for example, a fresh culture medium should be used.
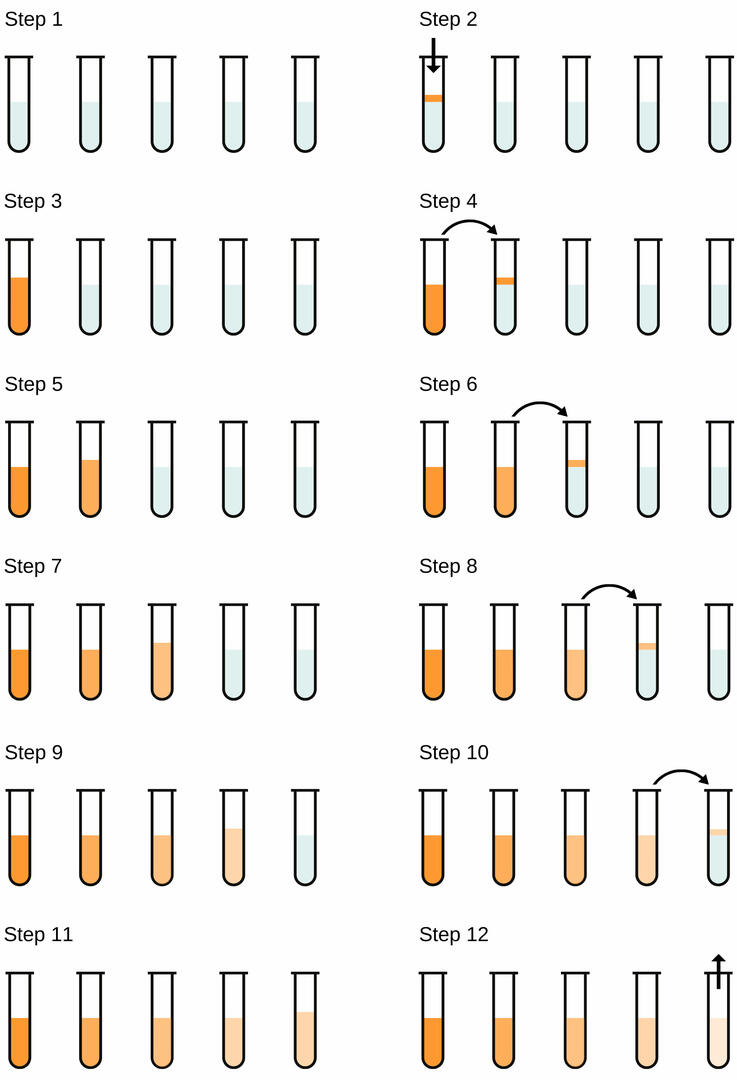
- Fill target containers with diluent: Once you have determined the diluent, fill the tubes or wells that you will use to set up the serial dilution with the desired amount of diluent (Figure 3, Step 1). More information on how to calculate the diluent volume can be found further below.
- Perform the first dilution: Ensure that the sample, reagent, chemical or compound that you want to dilute is well mixed, then transfer a defined volume to the first tube or well (Figure 3, Step 2). If you don't know what the required transfer volume for your experiment should be, please refer to the section 'Serial dilution calculations'.
- Perform the second dilution: Thoroughly mix the first dilution (Figure 3, Step 3), then aspirate the same transfer volume that you used in the previous step, and dispense it into the second tube or well (Figure 3, Step 4).
- Repeat: Extend the process of mixing the most recently obtained dilution and transferring some of it to the next tube or well, until you get to the end of your serial dilution experiment (Figure 3, Steps 5-11).
- Discard transfer volume: Your last tube or well will contain more liquid than all the previous dilutions. For some applications, this is not an issue at all. For example, when you set up a serial dilution of a bacterial culture in tubes and want to incubate 1 ml of every tube with culture media. In some cases, however, the liquid volume in every tube or well needs to be equal, such as when your plate needs to go into a plate reader for analysis. In this case, aspirate the transfer volume from the last tube or well and discard it at the end of setting up your serial dilution (Figure 4, Step 12).
Serial dilution calculations
As we have already seen, the dilution factor is defined by your application, with the most common values being two and ten. The other variable that you have to know is the final volume needed for downstream applications or analyses after the last step of the serial dilution. With these two figures, you can then easily calculate all of the other parameters that are important for serial dilutions.
For example, by dividing the final volume with the dilution factor, you can find out the transfer volume of sample, reagent, chemical or compound that you need to add to the first tube or well of your serial dilution, as well as the transfer volume for the subsequent dilution steps, using the following equation:
Final volume / dilution factor = transfer volume
Subtracting the transfer volume from the final volume needed gives the diluent volume that has to be dispensed into the tubes or wells used to set up a serial dilution:
Final volume – transfer volume = diluent volume
Once you have calculated the required diluent and transfer volumes, you can perform the serial dilution, as well as downstream applications and analyses. This will allow you to find the tube or well where the sample, reagent, chemical or compound concentration was just right to obtain your desired result, such as a countable number of bacterial cells or the inhibition of the growth of a pathogen.
Once you have identified this tube or well, you will need to know what its final dilution factor is. This can be calculated by multiplying the dilution factors of every dilution step. For example, if you performed a 7-step 10-fold serial dilution, the final dilution factor of the last tube or well would be:
10 x 10 x 10 x 10 x 10 x 10 x 10 = 107 = 10,000,000
If you know the concentration of your initial sample, reagent, chemical or compound, you can then calculate the concentration of the tube or well that produced the desired result as follows, e.g., to find out the necessary compound concentration to inhibit the growth of a pathogen:
Initial concentration / final dilution factor = required concentration
If you don't know the initial concentration. but you do know the concentration of the tube or well that produced the desired result, e.g. because you counted the bacterial colonies that grew in the culture medium, you can calculate the initial concentration as follows:
Measured concentration x final dilution factor = initial concentration
Limitations of serial dilutions
Serial dilutions are the perfect method to estimate the concentration of an analyte of interest in a sample, or to quickly reduce the concentration of a reagent, chemical or compound. However, as with every technique, they also have some limitations.
Reproducibility
One of the major challenges when setting up serial dilutions is reproducibility. Since the method consists of several steps, the slightest pipetting errors or inaccuracies accumulate over the course of the workflow, with the highest dilution being the least accurate and precise. Based upon the assumption that your pipettes are properly maintained and calibrated, human influence has the largest impact on your results. Therefore, observing good pipetting practices is of utmost importance.
Good pipetting practices
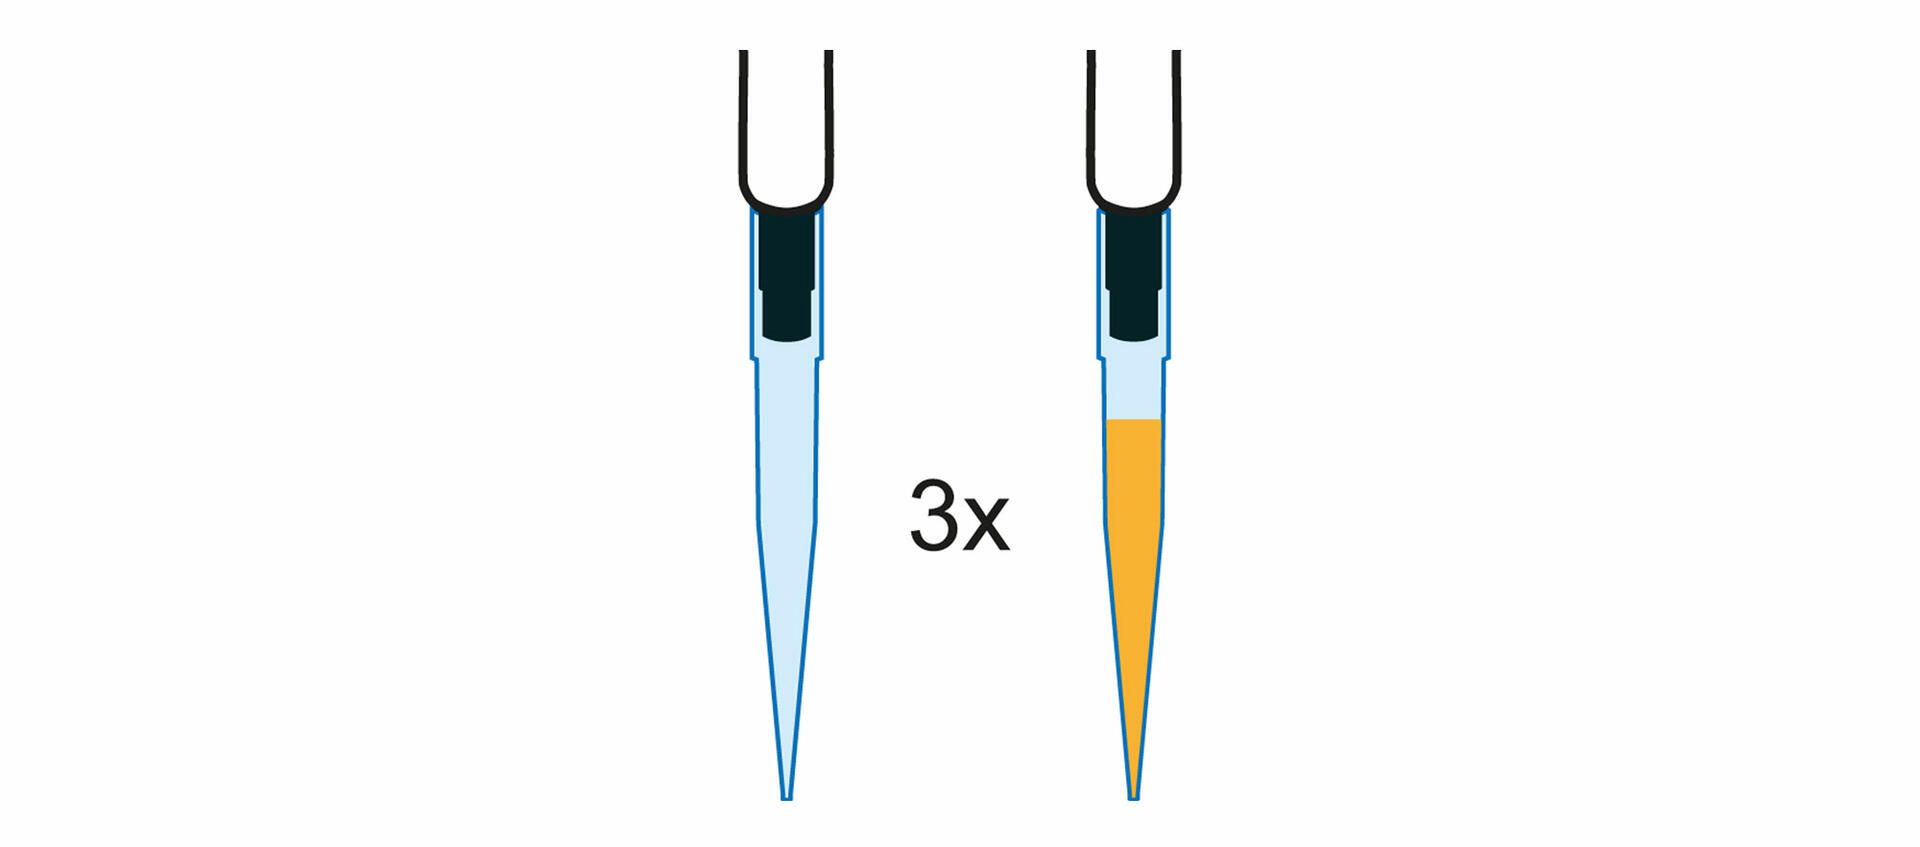
Before setting up your serial dilution, you should perform a pre-wet of your pipette tips. Do this by aspirating and dispensing the full volume of diluent two to three times. This procedure not only equilibrates temperature differences between the liquid and the tip, but also humidifies the dead air space inside the pipette and tip. Neglecting to perform a pre-wet step can result in a smaller delivery volume in the first few dispenses, introducing errors into subsequent dilution steps.
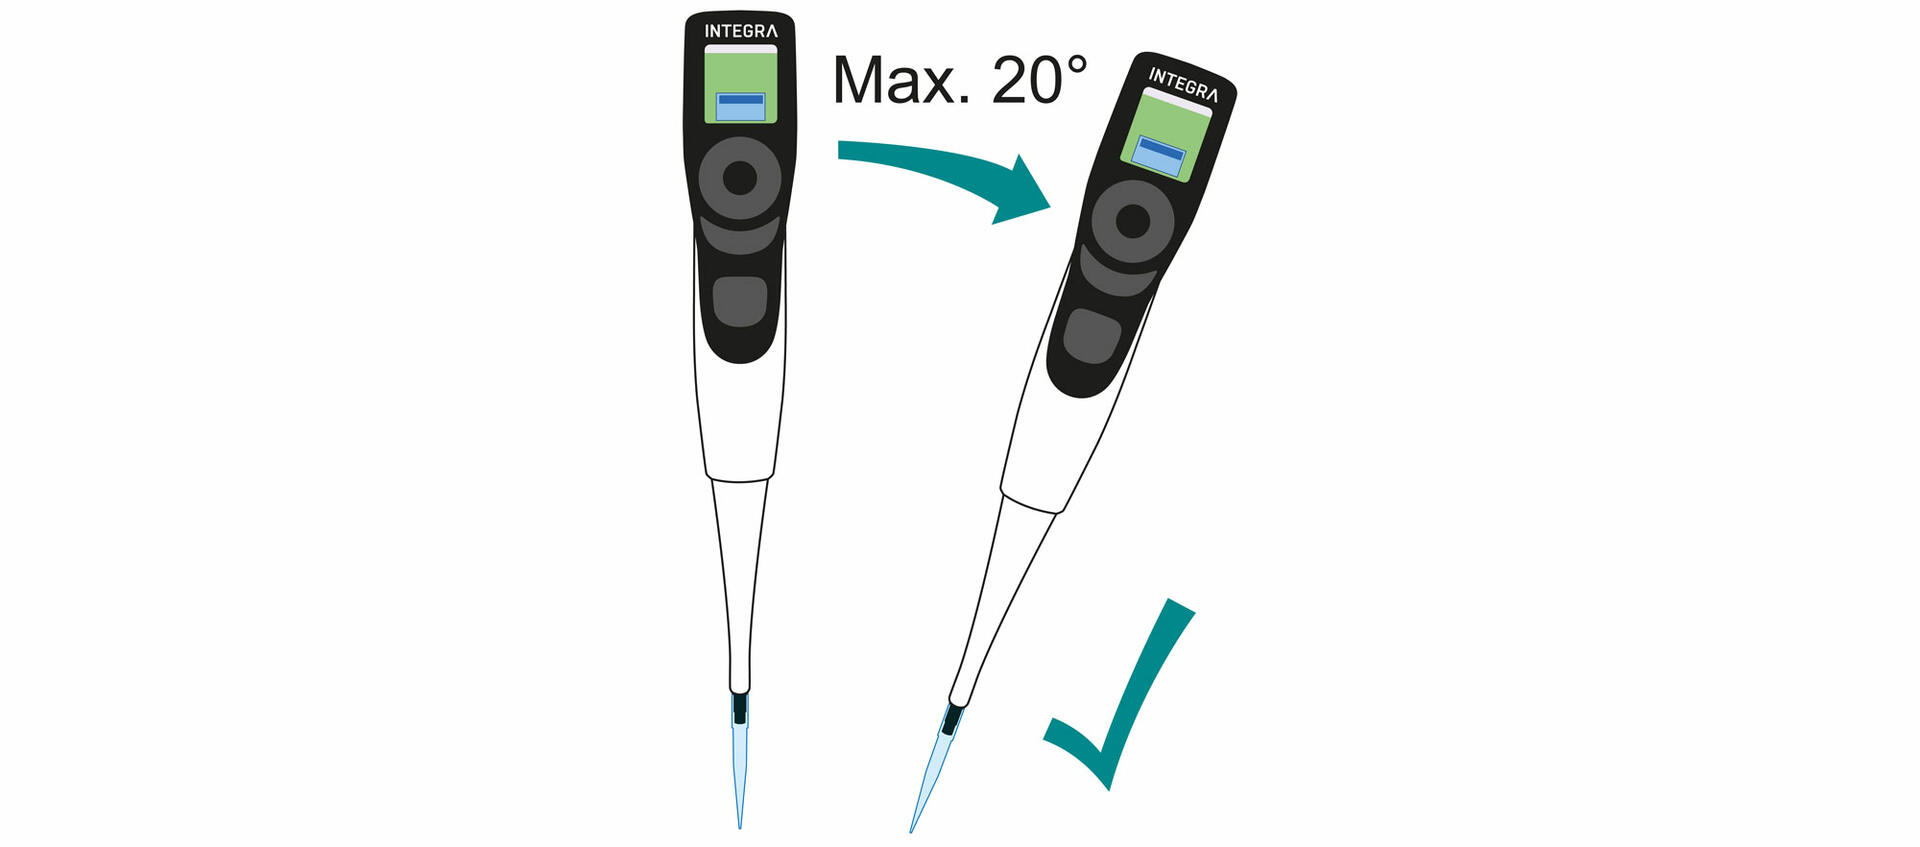
The liquid volume in the tip is also influenced by the angle and immersion depth of the pipette during aspiration. It is therefore important that you hold your pipette at a consistent angle, a maximum of 20° from vertical, throughout the entire dilution series. Moreover, you should immerse the pipette tip just below the liquid surface to allow the desired volume to be aspirated. If the tip is immersed too deep, the risk of carryover due to liquid drops clinging to the outer surface of the tip is increased.
Mixing parameters also need to be optimized, as an inhomogeneous mixture could lead to significant errors. Two factors that can improve mixing results are a higher number of mixing cycles and a larger mixing volume. However, you should not increase these unnecessarily, as this will substantially prolong assay preparation times. Moreover, you should keep an eye on the aspiration and dispense heights during the mixing steps. Mixing with the tip end at the very bottom of a tube or well results in poorer mixing, because insufficient turbulence is generated. Ideally, the liquid should be dispensed near the top of the liquid, and aspirated from the middle. However, you should take care not to remove the tip from the liquid during mixing, to prevent drawing in air.
To learn more about how liquid handling paramenters influence the reproducibility of serial dilutions, please also read our article 'Master the art of pipetting and learn how to perform serial dilutions with our comprehensive guide'.
Automation
Following the good pipetting practices outlined above can be challenging when using manual pipettes. For example, undertaking a serial dilution in a 96 well plate with five mix cycles per row requires a total of 110 manual plunger movements with a multichannel pipette. This is not only tiring for your thumb, but also for your mind, especially if you want to keep the pipetting parameters consistent. Using a handheld electronic pipette with a customizable serial dilute program can improve this process, because you can define the number of mixing cycles, and it will then run through them automatically without having to repeatedly press the plunger. Moreover, it will allow you to get more accurate and precise results, as the pre-wetting steps, pipetting speeds, mixing cycles and mixing volumes will always be consistent.
The parameters that cannot be controlled with a handheld electronic pipette are the pipetting angle, the tip immersion depth, and the aspiration and dispense heights during the mixing steps. If you want to ensure that these are kept consistent as well, you need to opt for a pipetting robot or a 96 or 384 channel benchtop pipette that allows you to load a single row or column of tips.
If you want to learn more about our solutions for streamlined serial dilutions, please refer to these articles:
Working with bacterial cells
When serially diluting reagents, chemicals or compounds, your results are very reproducible if you follow the best practices above, or even automate your process. However, when diluting particles or cells, the assay results tend to diverge from the theoretical results, especially at lower concentrations of only a few hundred particles or cells per milliliter. The reason is that the sample-diluent mixture is too heterogeneous to result in a perfectly uniform serial dilution.3 For example, if you have a sample-diluent mixture of 10 milliliters with a total concentration of 3,000 bacterial cells, you expect that transferring one milliliter to the next tube results in a new concentration of 300 bacterial cells. However, because the mixture in the first tube is not perfectly uniform, it could be that you only transfer 298 bacterial cells. This means that concentrations calculated using serial dilutions of particles or cells are only estimates.
Conclusion
The applications of serial dilutions are very diverse, yet the technique itself is always performed in the exact same way, following a series of simple pipetting steps. Unfortunately, performing these steps manually can be a challenging task, because the slightest liquid handling inconsistencies accumulate during the workflow, leading to imprecise results. This is why serial dilutions are ideally performed with 96 or 384 channel benchtop pipettes or small pipetting robots, ensuring that the pipetting parameters are always consistent.
Did you like this article?
Further reading:
Ask our expert. Leave a comment!
Write us if you have any questions regarding the blog article.