How does PCR work and what are its 3 steps?
Written by Éva Mészáros
23. June 2022
Polymerase chain reaction (PCR) methods have been carried out in labs around the world since the 1980s, opening the door for an array of new applications, such as genetic engineering, genotyping and sequencing. So, how does PCR work? In this guide, we take a deep dive into this fascinating technique by defining what PCR is, explaining how its 3 steps work, exploring its history, looking into the different types of PCR, discussing troubleshooting tips and much more.
Table of contents
What is PCR?
PCR
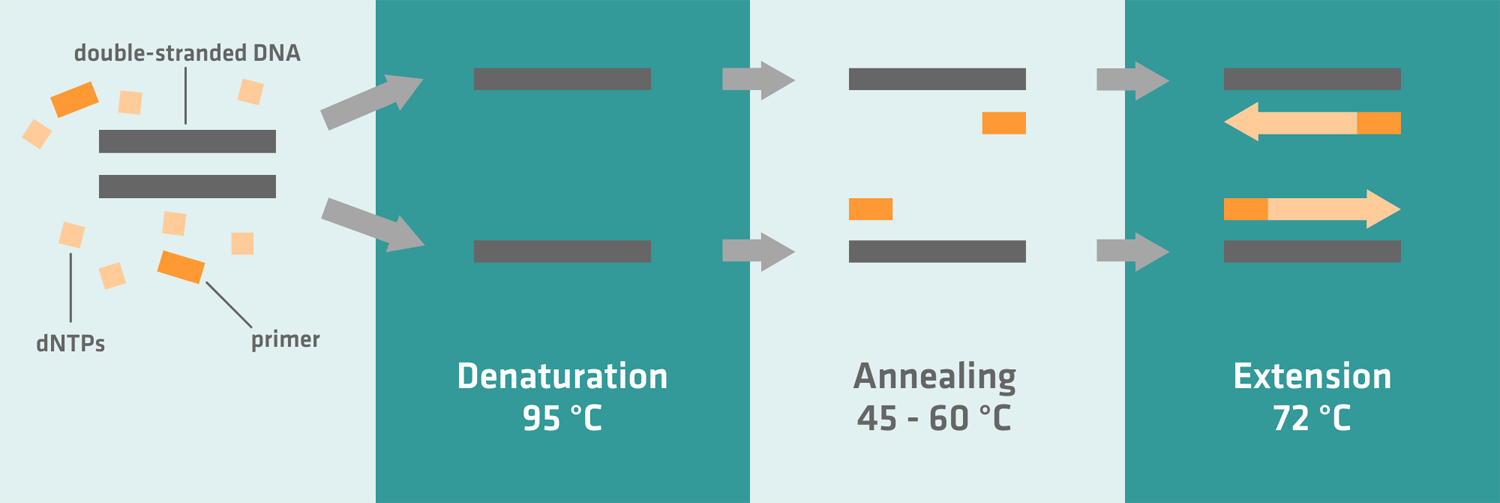
The polymerase chain reaction (PCR) is a fast and inexpensive technique for amplifying a DNA sequence of interest. It consists of three steps:
- Denaturation: The sample is heated to separate the DNA into two single strands.
- Annealing: The temperature is lowered to allow primers to anneal to specific single-stranded DNA segments, flanking the sequence to be amplified.
- Extension: The temperature is raised to the optimum working temperature of the polymerase enzyme, which then makes a complementary copy of the DNA sequence of interest.
One such repetition or 'thermal cycle' theoretically doubles the amount of the DNA sequence of interest present in the reaction. Typically, 25 to 40 cycles are performed – resulting in millions or even billions of DNA copies – depending largely on the amount of DNA in the starting sample and the number of amplicon copies needed for post-PCR applications.
The three steps of a PCR reaction are carried out automatically by a thermal cycler, but can only be successful if the master mix has been correctly prepared. The following sections explain the components that make up the master mix and how they interact with the template DNA during thermal cycling.
PCR master mix components
The PCR master mix consists of six components:
- PCR-grade water: Certified to be free of contaminants, nucleases and inhibitors.
- dNTPs: Containing equal concentrations of the four nucleotides (dATP, dCTP, dGTP and dTTP), which are the 'building blocks' to create complementary copies of the DNA sequence of interest.
- Forward and reverse primers: Short, single-stranded DNA sequences that anneal specifically to the plus and minus strands of the template DNA, flanking the sequence to be amplified. For some assays – such as protocols amplifying much-studied genes or DNA sequences of common bacteria – ready-to-use primers can be purchased. However, many experiments require custom PCR primers tailored to the region of interest of the template DNA and the reaction conditions. More information on this topic can be found in our article How to design primers for PCR.
- DNA polymerase: Taq-polymerase is the most commonly used enzyme for PCR reactions. It uses dNTPs to create complementary copies of the DNA sequence of interest. For some applications, such as mutagenesis, Taq-polymerase is not accurate enough and the use of high fidelity polymerases is recommended. Just like Taq-polymerase, they sometimes add an incorrect nucleotide when replicating the template DNA but, as they have a 3' to 5' exonuclease activity, they 'proofread' the newly synthesized strands and correct any mistakes.1 This proofreading step is highly beneficial for accuracy but it also slows down PCR reactions, and high fidelity polymerases (also called slow polymerases) therefore need about twice the time of Taq-polymerase to create a complementary DNA strand. The most popular high fidelity DNA polymerase is Pfu-polymerase.2
Interesting fact: Taq-polymerase was originally isolated from the bacterium Thermus aquaticus. First discovered in a hot spring in Yellowstone National Park in the 1960s, this enzyme can resist the high temperatures necessary for DNA denaturation. - Buffer: Provides a suitable environment for the DNA polymerase, with a pH between 8.0 and 9.5.3
- Magnesium chloride: Increases the activity of the DNA polymerase and helps primers to anneal to the template DNA for a higher amplification rate.4 This cofactor is sometimes included in the buffer in a sufficient concentration.5
The template DNA , which may be genomic DNA (gDNA), complementary DNA (cDNA) or plasmid DNA (pDNA), is then added after master mix preparation.
If you would like to learn how to calculate and accurately pipette the required amounts of the various master mix reagents, read our blog post Simple PCR tips that can make or break your success.
The 3 steps of PCR
After preparing the PCR master mix and adding the template DNA samples to it, you can load your reaction tubes, PCR strips or microplates into the thermal cycler. They will then go through the following steps:
- Denaturation: The thermal cycler first heats the reaction mix to 95-98 °C to denature the template DNA, separating it into two single strands. Depending on your sample, this usually takes 2-5 minutes during the first thermal cycle, and 10-60 seconds for subsequent cycles.
- Annealing: When the temperature is lowered, the primers anneal to the sequences flanking the template DNA region of interest. Depending on the sequence and melting temperature of your primers, this step usually takes 30-60 seconds, and the optimal annealing temperature typically lies between 45 and 60 °C.
- Extension: The temperature is increased to 72 °C, which is the ideal working temperature for the Taq-polymerase. Depending on the synthesis rate of your polymerase, and the length of the target sequence, it usually takes 20-60 seconds to create complementary copies of the DNA sequence of interest.6 After approximately 25-40 cycles – depending on the amount of DNA present at the start, and the number of amplicon copies needed for post-PCR applications7 – the last extension step should be extended to 5 minutes or longer, allowing the Taq-polymerase to finish the synthesis of uncompleted amplicons.5 If you can't immediately take your samples out of the thermal cycler after the final extension step because you're busy with other experiments, program it to cool your samples to 4 °C. For overnight runs where you leave your samples in the thermal cycler for hours after the final extension step, you should opt for a holding temperature of 10 °C instead of 4 °C, as it causes less wear and tear on your machine.
As shown in the image above, the amount of PCR product theoretically doubles at every thermal cycle, leading to an exponential increase of PCR product. However, in reality, the phase of exponential amplification eventually levels off and reaches a plateau because the reagents have been consumed and the DNA polymerase activity decreases.
The different types of PCR
After performing a standard PCR reaction, you can determine the concentration, yield and purity of the amplified DNA sequences using gel electrophoresis, spectrophotometry or fluorometry. However, you can’t determine the amount of template DNA present in a sample before amplification using standard PCR. If this is a requirement for your experiment, you have to perform a qPCR reaction, as described below.
qPCR
qPCR – also called real-time PCR, quantitative PCR or quantitative real-time PCR – is a technique used to detect and measure the amplification of target DNA as it is produced. In contrast to conventional PCR reactions, qPCR requires a fluorescent intercalating dye or fluorescently-labeled probes, and a thermal cycler that can measure fluorescence and calculate the cycle threshold (Ct) value. Typically, the fluorescence intensity increases proportionately to the concentration of the PCR product being formed, measuring quantities of the target in real time.
qPCR can be divided into dye-based methods (e.g. SYBR® Green) and probe-based methods (e.g. TaqMan®). To learn more about these two types of qPCR assays, their validation and data analysis, read our blog post qPCR: How SYBR Green and TaqMan real-time PCR assays work.
RT-PCR and RT-qPCR
Another limitation of standard PCR is that it can only be used to amplify DNA sequences. If you want to amplify RNA target sequences, you have to use RT-PCR.
RT-PCR
Reverse transcription PCR (RT-PCR) is used to amplify RNA target sequences, such as messenger RNA or RNA virus genomes. This type of PCR involves an initial incubation of the RNA samples with a reverse transcriptase enzyme and a DNA primer – comprising sequence-specific oligo (dT)s or random hexamers – prior to the PCR amplification.
You can also perform a qPCR reaction instead of executing a standard PCR reaction after the reverse transcription step, which produces cDNA from RNA. This PCR variant is called RT-qPCR.
vPCR
The third limitation of standard PCR is that it cannot distinguish between the DNA of viable and non-viable cells. You should use vPCR if this is important to your application, for example, because you want to know if the infectious microorganisms in a clinical sample are dead or alive.
vPCR
For viability PCR (vPCR), each sample needs to be split into two aliquots. One aliquot is incubated with a photoreactive intercalating dye that is unable to diffuse through intact cell membranes of live cells. This means that it only intercalates into the DNA of dead cells. When this aliquot is subsequently treated with a blue light, the dye binds irreversibly to the DNA. Both aliquots are then subject to DNA purification and qPCR amplification. If they exhibit similar qPCR signals, the target microorganisms in the sample are mostly viable. If the dye-treated aliquot exhibits a weaker signal, the target microorganisms are mostly dead. vPCR is an important technique in diagnostics, agriculture and food safety.
ddPCR
Digital droplet PCR (ddPCR) is another relatively new type of PCR. It uses fluorescently labeled probes to detect DNA sequences of interest, and a water-oil emulsion system to split each sample into about 20,000 nanoliter-sized droplets. After amplification, every droplet of the sample is analyzed on its own. Droplets that contain at least one DNA sequence of interest emit a fluorescent signal – and are consequently positive – while droplets without the DNA sequence of interest don't fluoresce, and are therefore negative. Using the Poisson distribution, you can then determine the concentration of the DNA sequence of interest in the original sample by analyzing the ratio of positive to negative droplets for absolute quantification.8
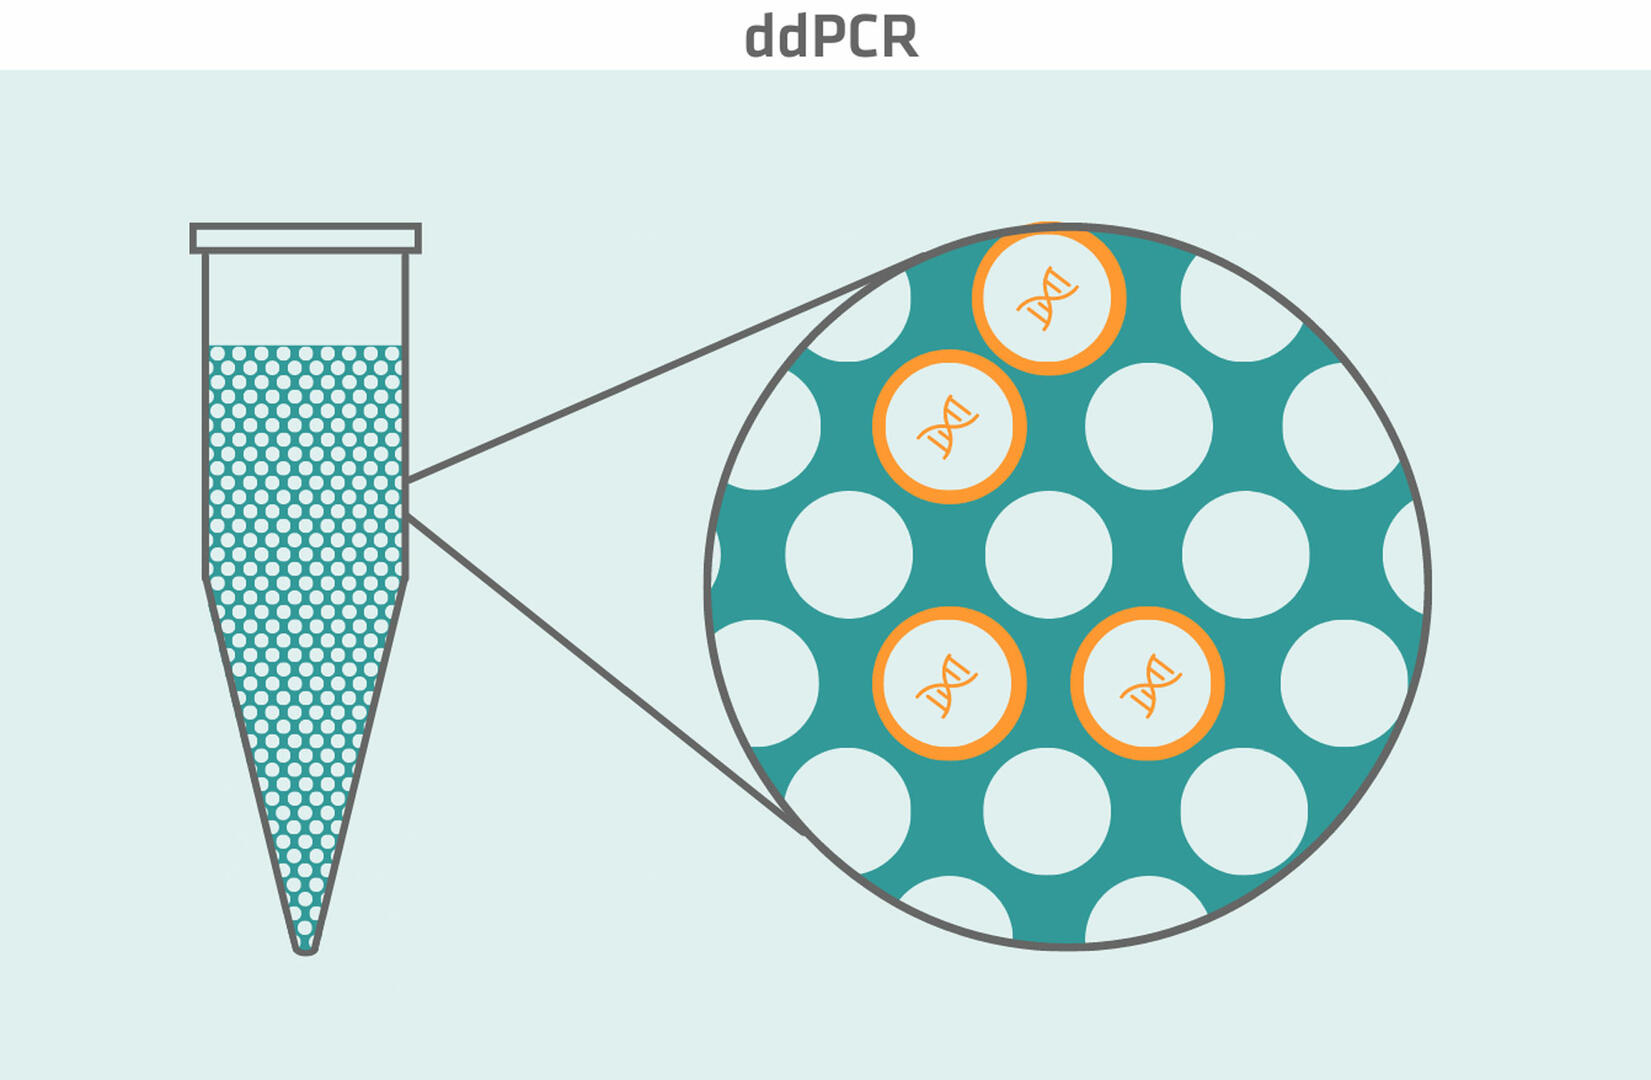
An advantage of ddPCR compared to qPCR is that it's more precise. While qPCR can detect two-fold differences in DNA target sequence variation, e.g. discriminate 1 copy from 2 copies of a gene, ddPCR can discriminate 7 copies from 8 copies, which means that it can detect differences as small as 1.2-fold.9 On top of that, ddPCR is better suited for multiplexing assays if you want to determine the ratio of low abundance to high abundance DNA sequences of interest, such as rare mutations on wild type backgrounds. When using qPCR, the fluorescent signal from the high abundance sequences can dominate and obscure the signal from the low abundance sequences. This risk is ruled out with ddPCR, as each droplet behaves as an individual PCR reaction and contains either zero, one or, at most, a few sequences of interest.10,11
Due to these advantages, ddPCR is often preferred over qPCR for the detection of mutations and SNPs (single nucleotide polymorphisms), allelic discrimination, gene expression studies, and the analysis of copy number variations.12
Hot start PCR
If your PCR reaction results in non-specific amplification, you can try to increase the reaction specificity using a hot start polymerase. This enzyme remains inactive during master mix preparation and sample addition at room temperature, eliminating the risk that unintended products and primer dimers are formed during PCR set-up.13
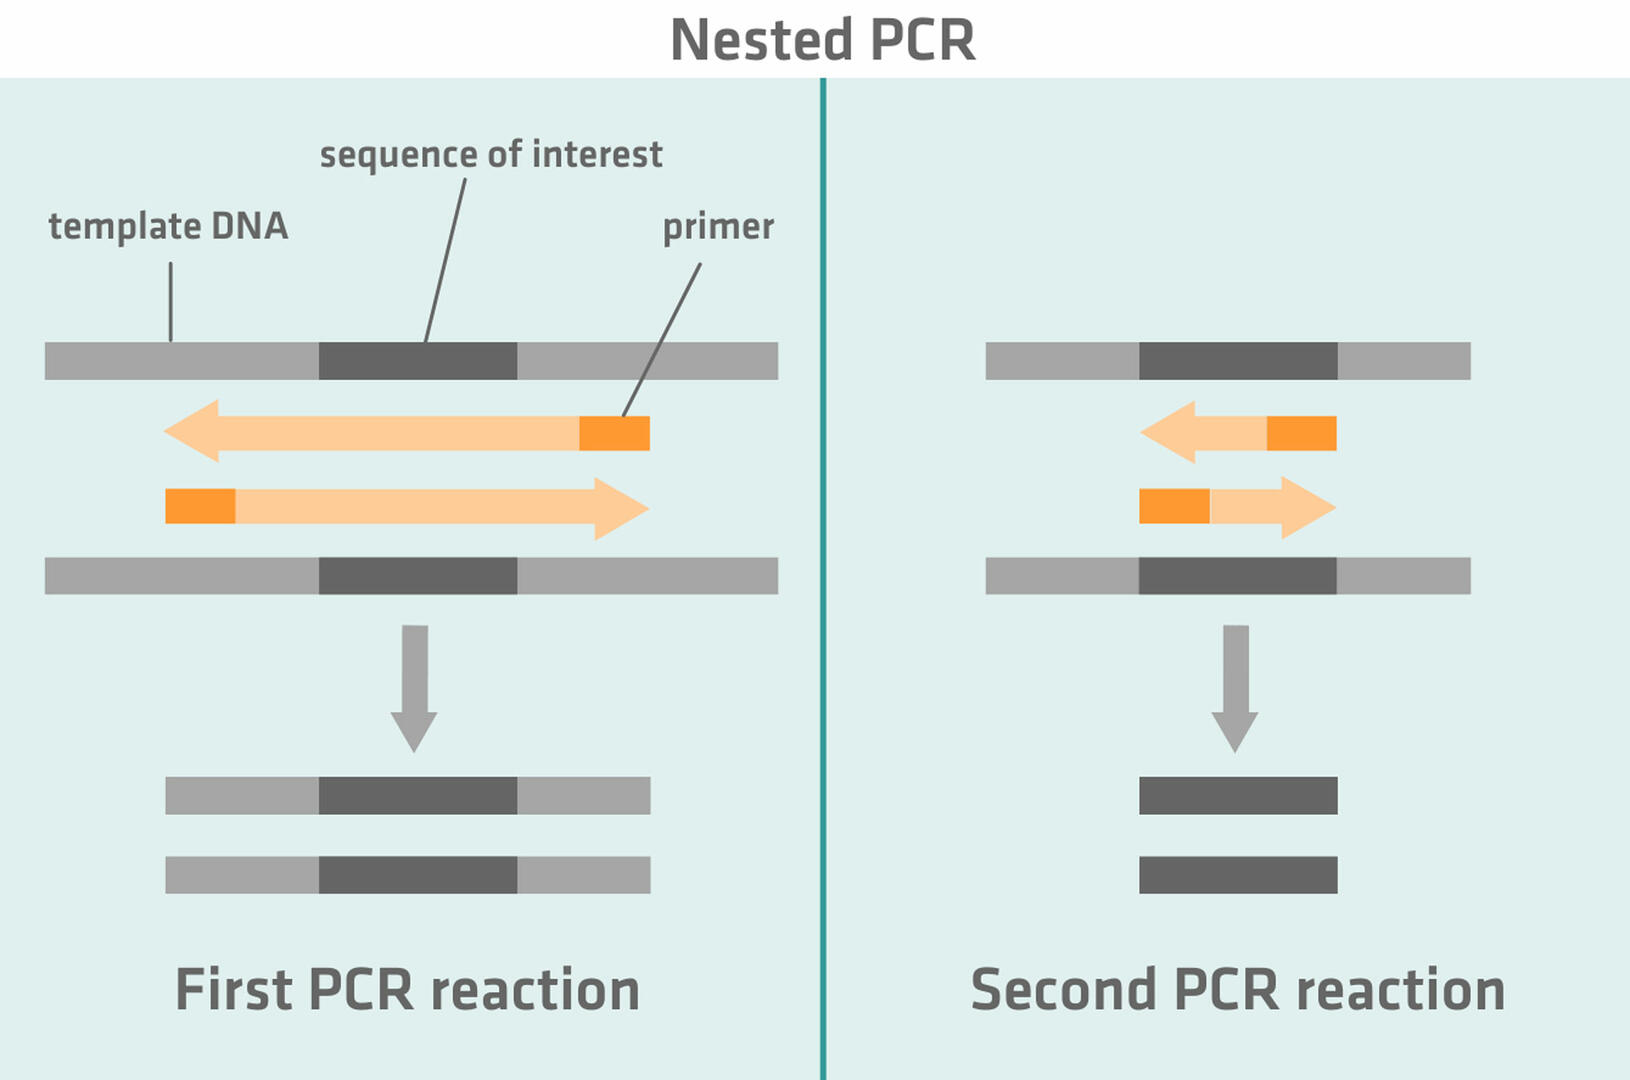
Nested and semi-nested PCR
Nested or semi-nested PCR are alternatives to hot start PCR that increase reaction specificity.
Nested PCR uses two sets of primers and two successive PCR reactions. The first set of primers is designed to amplify a DNA sequence slightly longer than the sequence of interest. During the second PCR reaction, the second set of primers that is specific to the sequence of interest anneals to the amplicons of the first PCR reaction and helps to amplify the sequence of interest.14,15
Semi-nested PCR works similarly to nested PCR. During the first PCR reaction, one primer anneals to the sequence of interest and the second primer to a region flanking the sequence of interest. This primer is then replaced with a second primer annealing to the region of interest during the second PCR reaction.
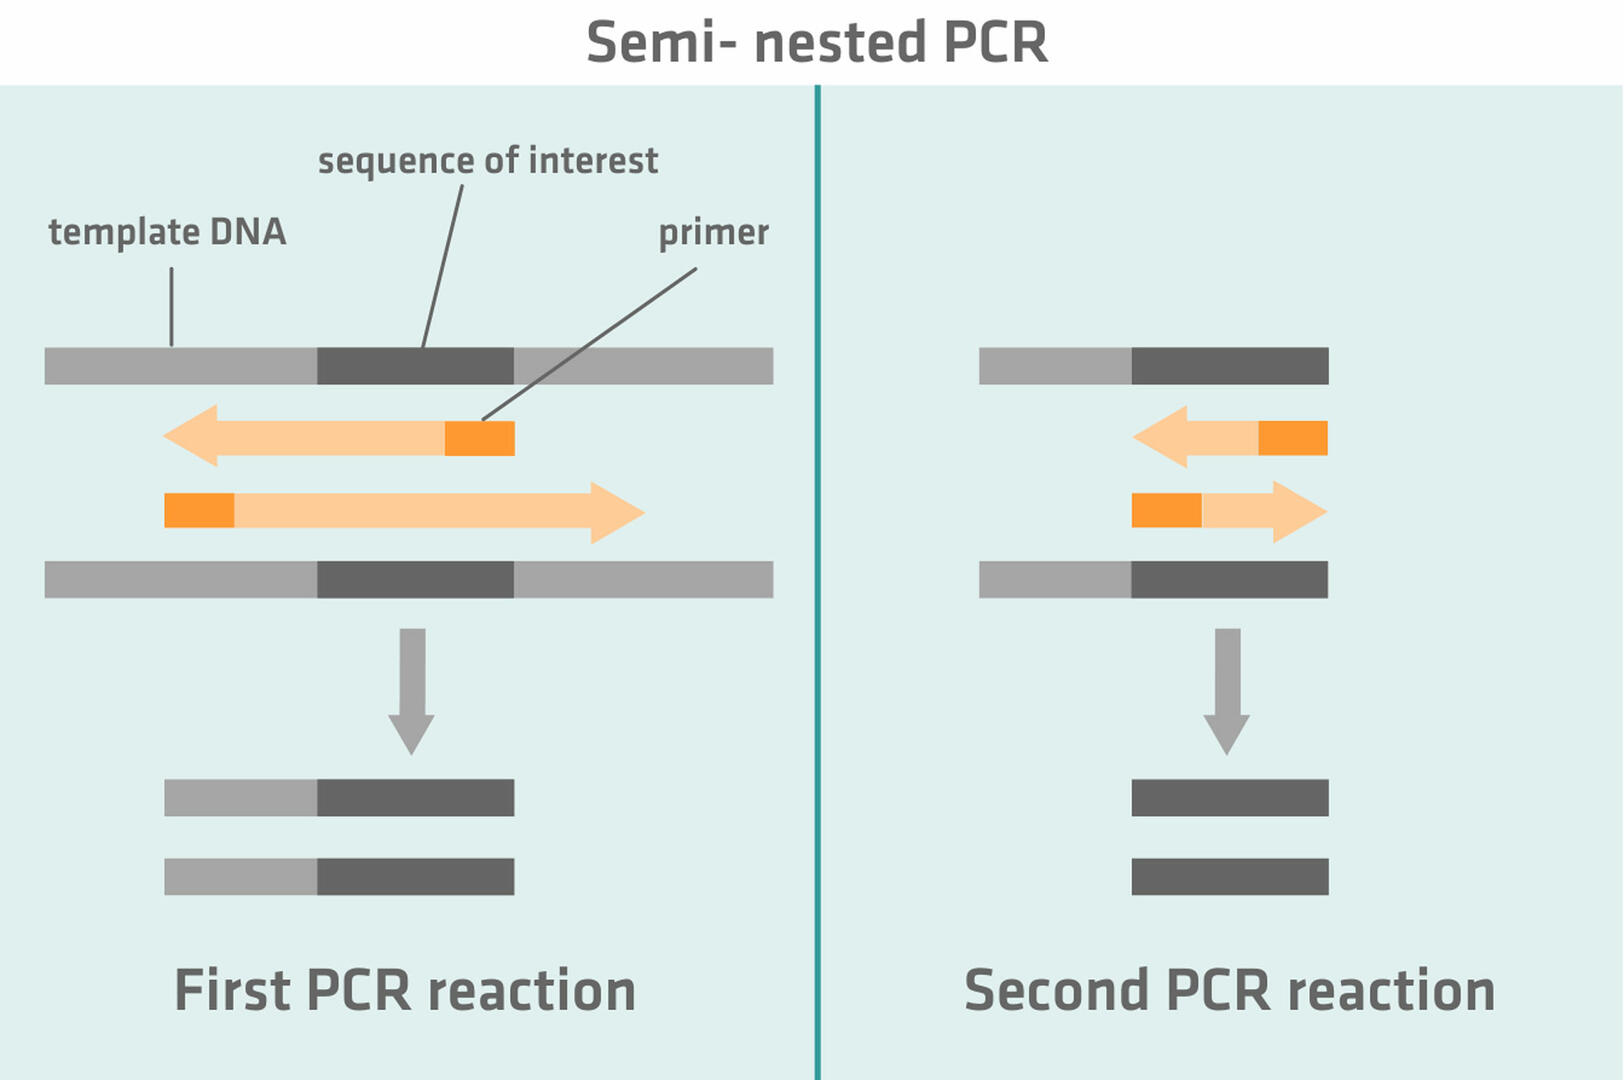
The idea behind nested and semi-nested PCR is that, if non-specific products were amplified during the first PCR reaction, these will not be amplified during the second PCR reaction, as the primers cannot anneal to them.
Touchdown PCR
A third type of PCR developed to increase reaction specificity is touchdown PCR. The assay set-up for touchdown PCR is identical to the set-up for standard PCR. The only difference lies in the annealing step. During the first thermal cycle, the annealing temperature should be several degrees above the optimal primer annealing temperature, then be lowered by 1-2 °C every second cycle.16 These high temperatures during the first cycles avoid PCR primers forming primer-dimers or binding to regions outside the DNA sequence of interest. The downside is that the PCR primers don't all sufficiently bind to the template DNA, which leads to low yields.17 However, this can be tolerated, as the low yield of specific amplicons is then exponentially amplified with every thermal cycle that is performed at the optimal annealing temperature.
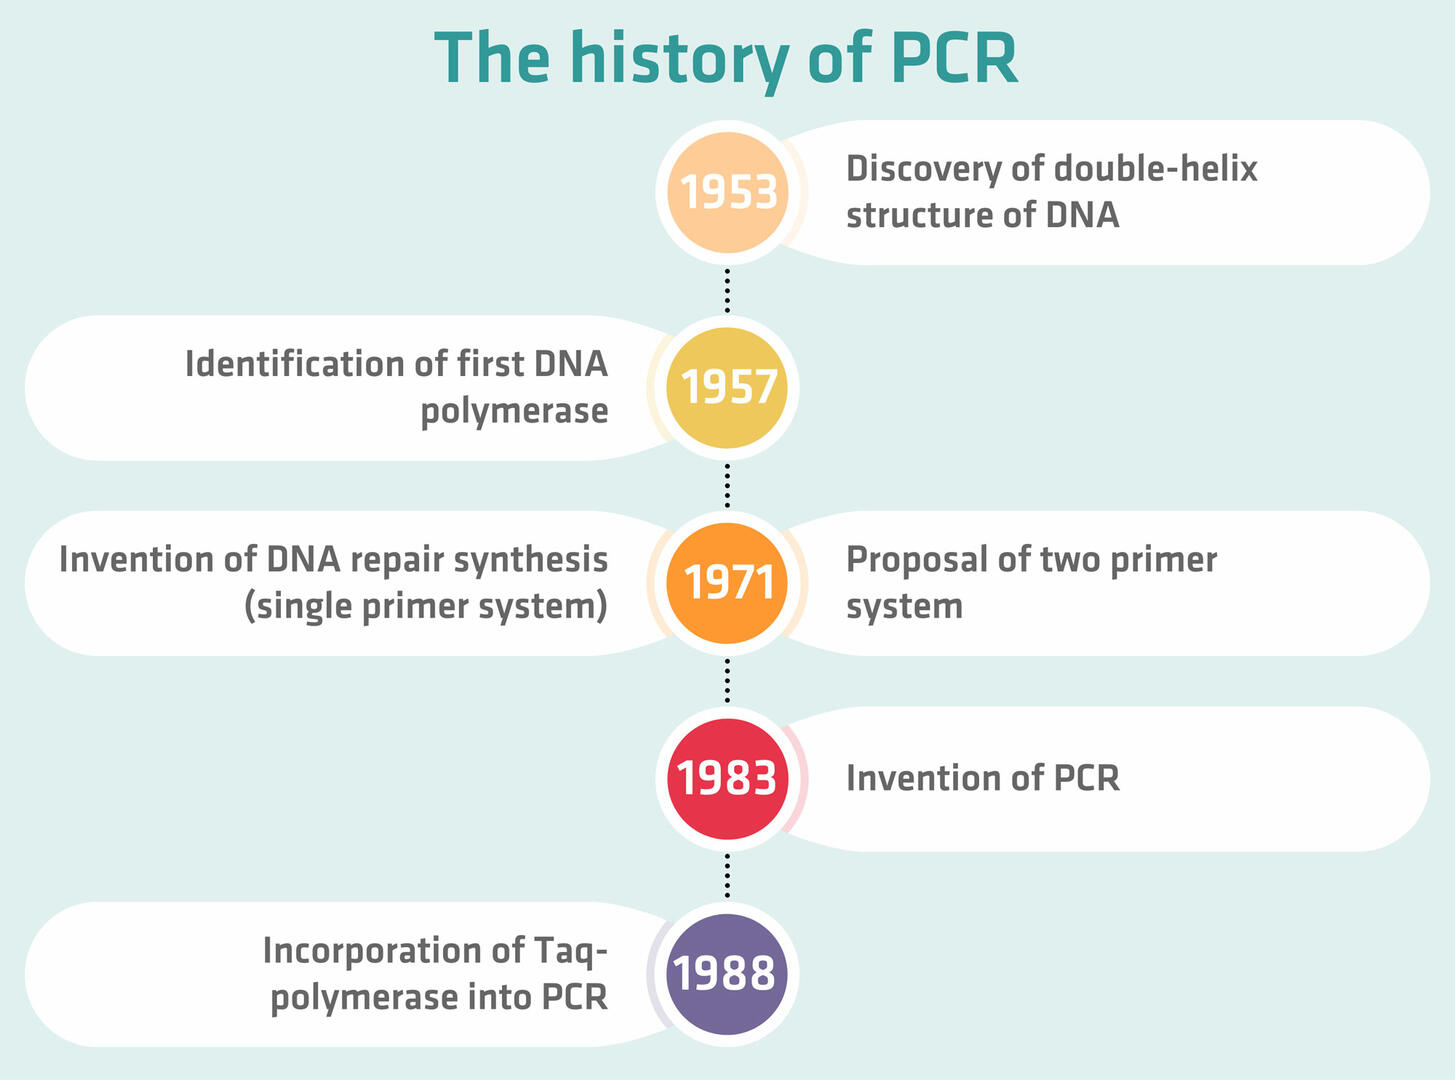
The history of PCR
As we've shown, there are many different types of PCR, and some of them have only recently been developed. However, the foundation for PCR was laid in the 1950s:
- In 1953, James Watson and Francis Crick discovered the double-helix structure of DNA, and suggested that there might be a possible copying mechanism for DNA.
- Four years later, Arthur Kornberg identified the first DNA polymerase that was able to copy the template DNA, although only in one direction.
- In 1971, Gobind Khorana and his team started to work on DNA repair synthesis. Their technique used DNA polymerase repeatedly, but employed only a single primer template complex, which did not allow exponential amplification.
- At the same time, Kjell Kleppe from Khorana's lab proposed a two primer system that would double the amount of DNA in a sample, but no one actually conducted the experiment to find out whether it worked. The reason for this was probably that there was not yet a DNA polymerase that could withstand the high temperatures of the denaturation step. This means that they would have had to add a fresh dose of enzyme after every thermal cycle.
- In 1983, Kary Mullis, working at Cetus Corporation, added a second primer to the opposite strand, and realized that repeated use of DNA polymerase triggers a chain reaction that will amplify a specific DNA sequence, thus inventing PCR. The patent got approved in 1987, and he won the Nobel Prize in Chemistry six years later.
- In 1976, the thermostable enzyme Taq-polymerase – which is typically used in PCR today – was first isolated from the bacterium Thermus aquaticus, which had been discovered in a hot spring of Yellowstone National Park in 1969. When it was finally incorporated into PCR workflows in 1988, it removed the need to add a new dose of enzyme after every thermal cycle, paving the way for the invention of automated thermal cyclers.18,19,20
PCR troubleshooting
One of the most important troubleshooting mechanisms is to always include positive and negative control samples.
If the sequence of interest wasn't amplified in your positive control sample, your master mix, template DNA or thermal cycler could be the source of the problem:
- Master mix: Have you added the right volume and concentration of each reagent, and have you cooled your reagents during master mix preparation?
- Template DNA: Have you run an agarose gel to ensure that your template DNA isn't degraded? Is your template DNA pure enough and, if not, have you purified it?
More information on how to determine the purity of DNA
More information on how to purify DNA - Thermal cycler: Is the number of thermal cycles sufficient for your assay? Have you programmed the device correctly, and is it calibrated to ensure that it performs the reaction steps at the right temperatures?
If the sequence of interest was amplified in your negative control sample, one or more components of your master mix is contaminated. PCR reactions are very sensitive, and create large number of copies of DNA sequences from minute amounts of starting material, so contamination is a common issue. To prevent it, the right lab set-up is crucial.
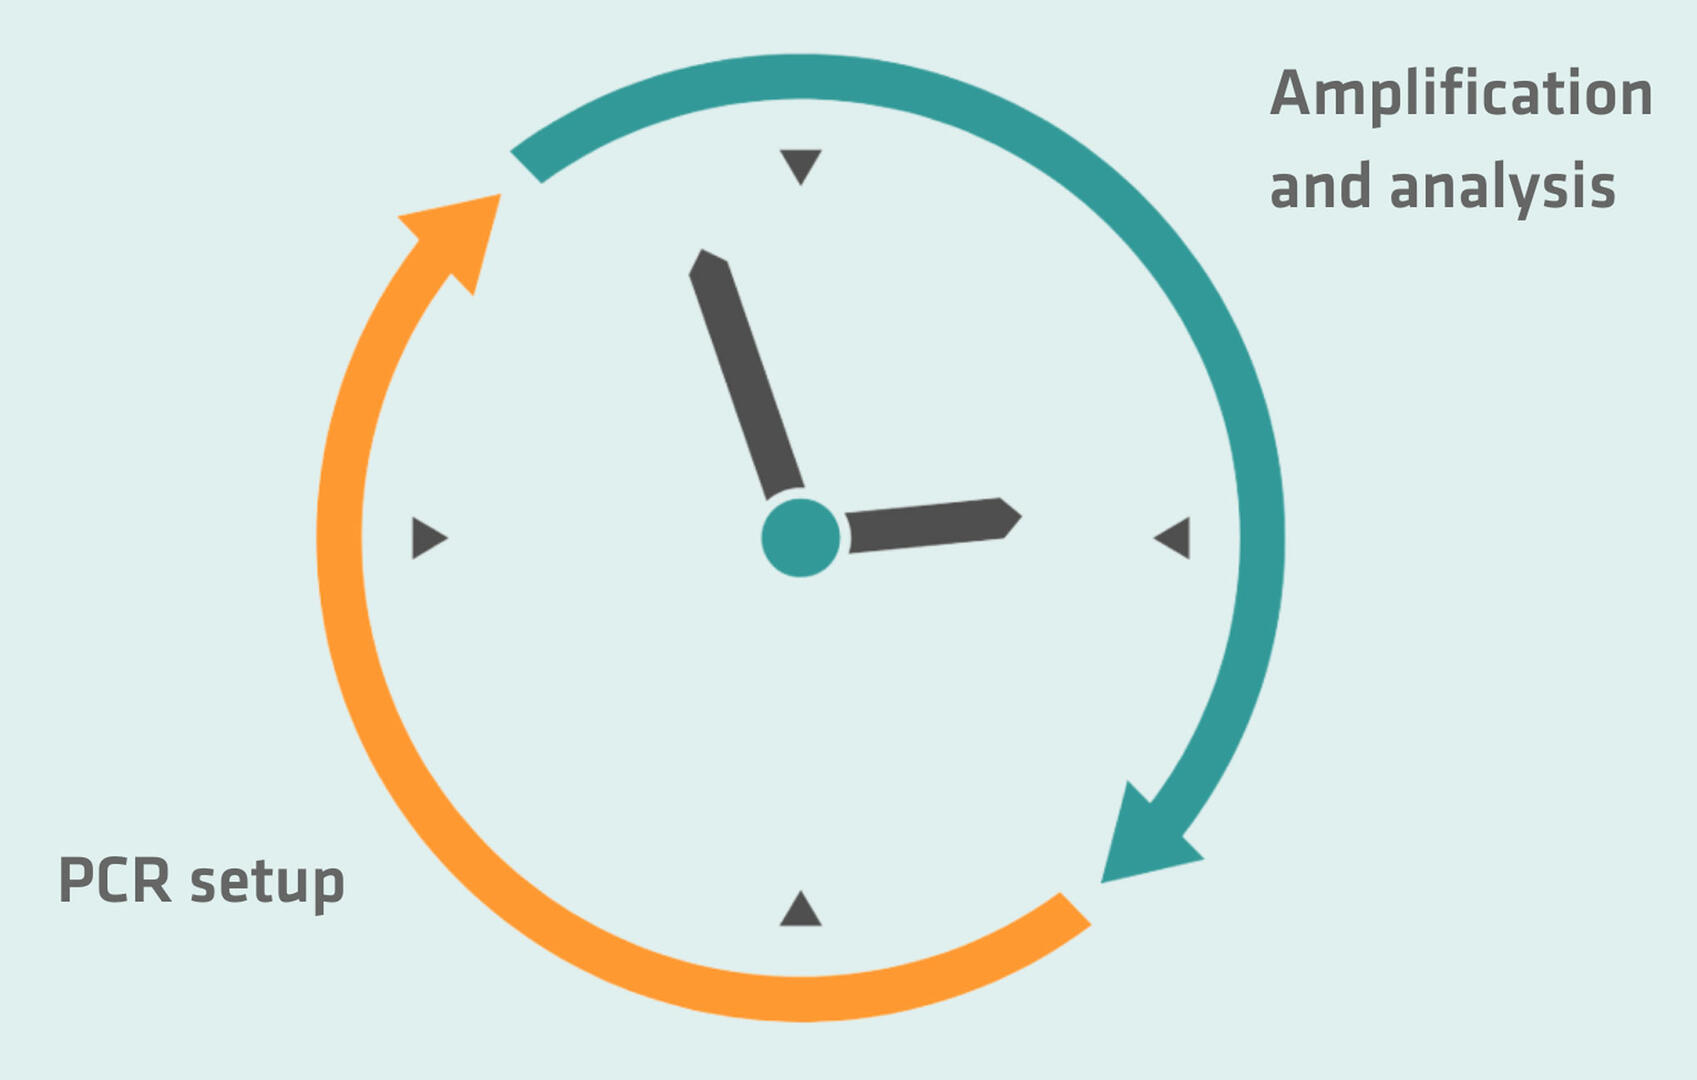
Lab set-up
Ideally, your PCR lab should have two rooms, each divided into two areas. The first room should be exclusively used for pre-PCR activities, and divided into a master mix preparation area and a sample preparation area. The second room should have a dedicated area for amplification, and another one for product analysis.
If you’re lacking in space or budget for a two-room PCR lab, you can set up the pre-PCR and amplification and analysis areas in the same room, but ensure they are as far from one another as possible. In addition to the spatial separation, you could also consider setting up your PCR reactions in the morning, and performing the amplification and analysis steps in the afternoon. Temporally separating the different steps of your PCR reactions may limit your flexibility and make you lose some time, but lowers the risk of aerosols with high DNA concentrations from the analysis area contaminating your master mix and samples in the pre-PCR area.
On top of these precautionary measures, you should always work in biosafety cabinets or laminar flow hoods when setting up your PCR reactions, use different sets of pipettes for master mix preparation, sample preparation and analysis, and make sure that you use filter tips and consumables that are free of DNase, RNase and PCR inhibitors.
In-depth information on the ideal PCR lab set-up and equipment can be found in our article Setting up a PCR lab from scratch.
Specificity
Another major PCR challenge is specificity. As explained before, it can be improved using hot start, nested, semi-nested or touchdown PCR. A further option to prevent the amplification of regions outside the DNA sequence of interest, as well as the formation of secondary structures, is to redesign your primers.
Use this checklist to see whether your primers meet all the requirements:
- Are your primers between 18 and 24 bp long?
- Is your target sequence length between 100 and 3000 bp for standard PCR assays, or 75 and 150 bp for qPCR assays?
- Do your primers have melting temperatures between 50 and 60 °C, and within 5 °C of each other?
- Have you performed a gradient PCR to determine the optimal annealing temperature?
- Does the GC content of your primers lie between 40 and 60 %?
- Have you avoided runs or repeats of four or more bases or dinucleotides?
- Have you made sure that your primers are not homologous to a template DNA sequence outside the region of interest?
- Have you checked that your primers can't form stable secondary structures?
If you can't answer all of the questions above with a 'yes', consider redesigning your primers according to the guidelines summarized in our article How to design primers for PCR.
PCR equipment
The most important PCR instrument is certainly the thermal cycler but, as the right pipetting devices can help create faster and more efficient workflows with fewer errors, we'll also look at a few different liquid handling options in this section.
Thermal cyclers
Before the development of thermal cyclers, scientists had to manually move their samples between water baths of different temperatures. The first thermal cycler prototype called 'Mr. Cycle' also used water baths to heat and cool the samples, and was developed by engineers at Cetus Corporation, where Kary Mullis worked when he invented PCR.21 Today's instruments work with electric heating and refrigeration units, and many different models with various additional features are available.
For standard PCR, a thermal cycler that can heat and cool your samples to the required temperatures might be sufficient to complete the different reaction steps. However, your thermal cycler will need additional properties – such as gradient capability or an integrated fluorometer – if you want to perform gradient PCR assays to optimize primer annealing temperatures, or qPCR assays to determine the amount of template DNA present in a sample before amplification.
Pipettes
While the thermal cycler is the star of PCR labs, the right pipettes help you to process more samples in less time, while ensuring maximal accuracy and precision. Electronic pipettes offering a 'repeat dispense' mode, for example, are a great option to boost the efficiency of aliquoting master mix into an entire well plate. Adjustable tip spacing pipettes, paired with low dead volume reagent reservoirs, can be a useful alternative to single channel pipettes when transferring reagents and samples between different labware formats. And, if you want to significantly cut your PCR set-up and purification time, pipetting robots or 96 and 384 channel pipettes might be the right tool for you.
Learn more about the pipetting solutions we offer, or check out our application notes and customer testimonials to learn how they can simplify PCR workflows:
- Testimonial: A better qPCR pipetting experience
- Testimonial: COVID-19 – Accelerate your PCR set-up
- App note: Efficient and automated 384 well qPCR set-up with the ASSIST PLUS pipetting robot
- App note: Automated RT-PCR set-up for COVID-19 testing
- App note: Increase your sample screening and genotyping assay throughput with the VOYAGER adjustable tip spacing pipette
- App note: PCR product purification with QIAquick® 96 PCR Purification Kit and the VIAFLO 96 handheld electronic pipette
- App note: PCR purification with Beckman Coulter AMPure XP magnetic beads and the VIAFLO 96
- App note: PCR purification with Beckman Coulter AMPure XP magnetic beads and the ASSIST PLUS
- App note: Minimizing dead volume during qPCR set-up with the divided reservoir on the ASSIST PLUS pipetting robot
Conclusion
We hope that this article has been useful in helping you understand the mechanisms behind the different types of PCR, and has shown you different ways to avoid contamination and non-specific amplification.
If you have additional questions on PCR, please leave a comment below or check out our eBook on how to become a PCR pro!
Ask our expert. Leave a comment!
Write us if you have any questions regarding the blog article.