Cell counting with a hemocytometer (including calculations)
Written by Stefan Zeyen
04. July 2025
Cell counting forms the foundation of countless biological experiments, from determining cell viability after treatment to calculating seeding densities for culture experiments. To count cells, researchers have been relying on the hemocytometer for over a century, and despite advances in automated counting technologies, it remains indispensable in today's labs.
This comprehensive guide covers everything you need to know about hemocytometer cell counting, from different chamber types and step-by-step procedures to calculations and comparisons with modern alternatives.
Table of contents
What is a hemocytometer?
A hemocytometer, also known as a counting chamber, is a specialized glass slide designed for counting cells in suspension. Originally developed for blood cell counting – the name combines the words ‘hemo’, meaning blood, and ‘cytometer’, meaning cell measuring device – it is now used for counting various cell types, from mammalian cells to yeast, and even biological particles like spores.
The standard hemocytometer consists of 2 main components:
- Counting chamber: a thick glass slide with precisely etched grids of known dimensions, moats and raised supports for the coverslip on either side
- Coverslip: a specialized thick glass coverslip placed on the raised supports of the counting chamber
What makes a hemocytometer unique is the precisely defined volume between the coverslip and the counting chamber. When the coverslip is properly positioned on the counting chamber, it creates a space with an exact height above the grid. This defined height, combined with the known area of the grid squares, allows researchers to calculate the concentration of cells in the original suspension.
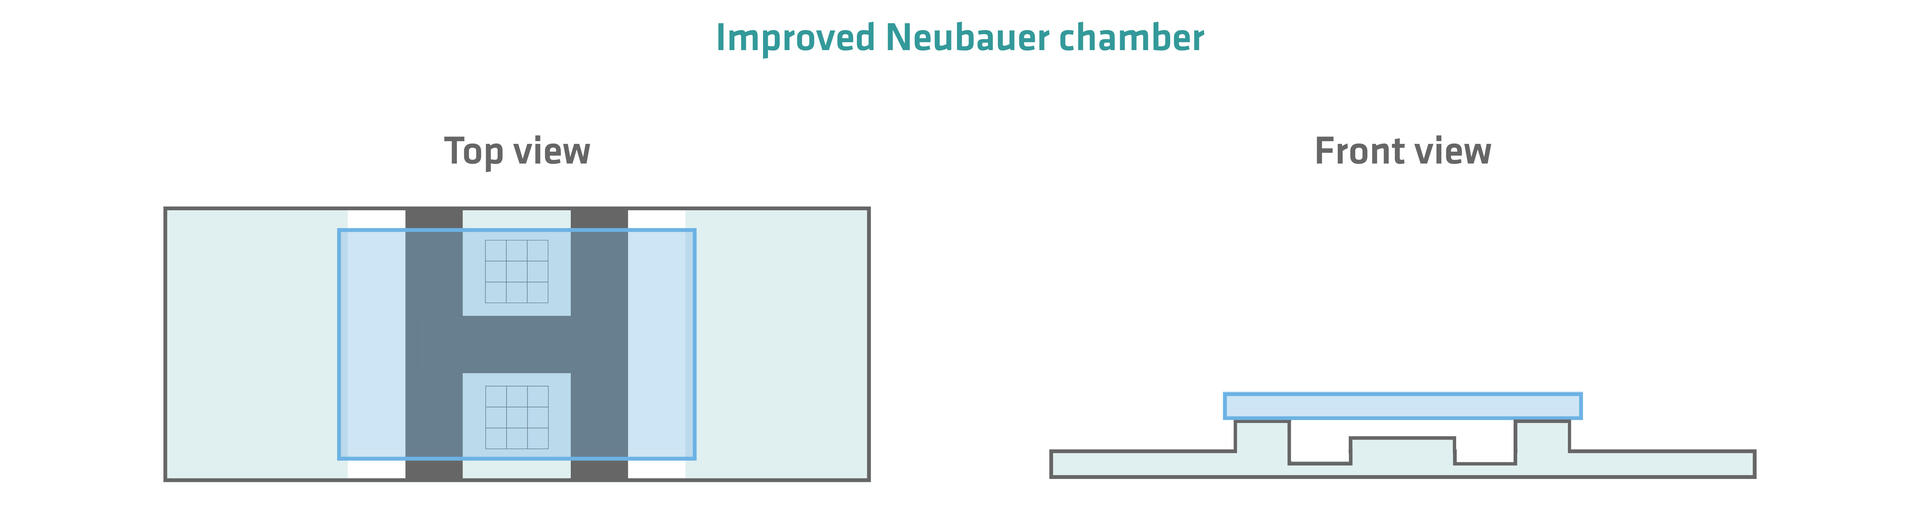
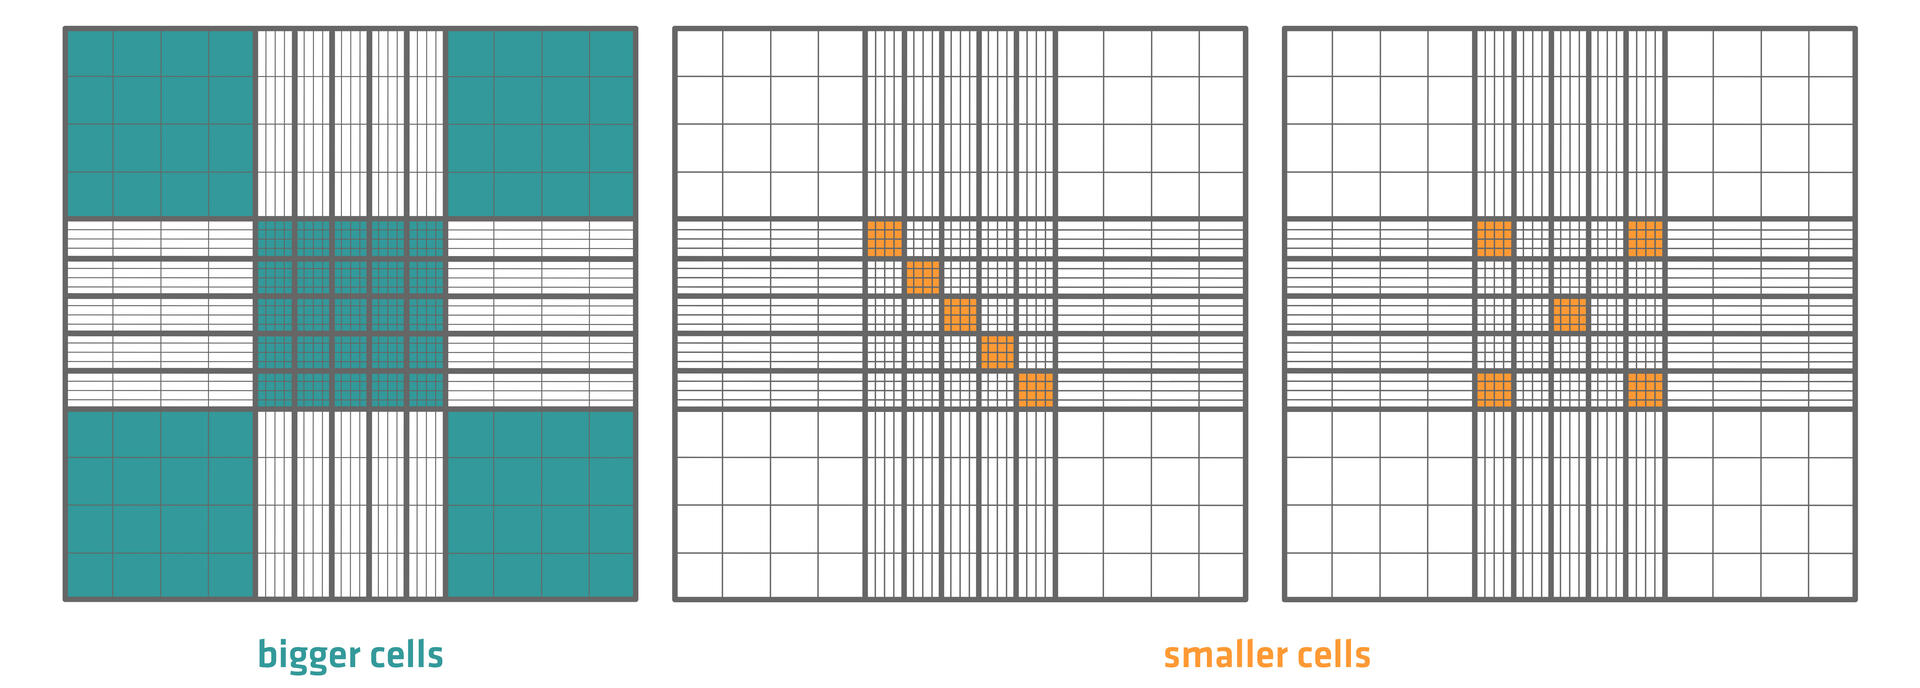
Several types of hemocytometers exist, differing primarily in their grid patterns and chamber heights. The most widely used hemocytometer is the Improved Neubauer chamber. It features an H-shaped moat forming 2 plateaus with etched grids. The raised supports next to the moat ensure that counting chambers with a height of 0.1 mm are created above the grids when a coverslip is placed on them.
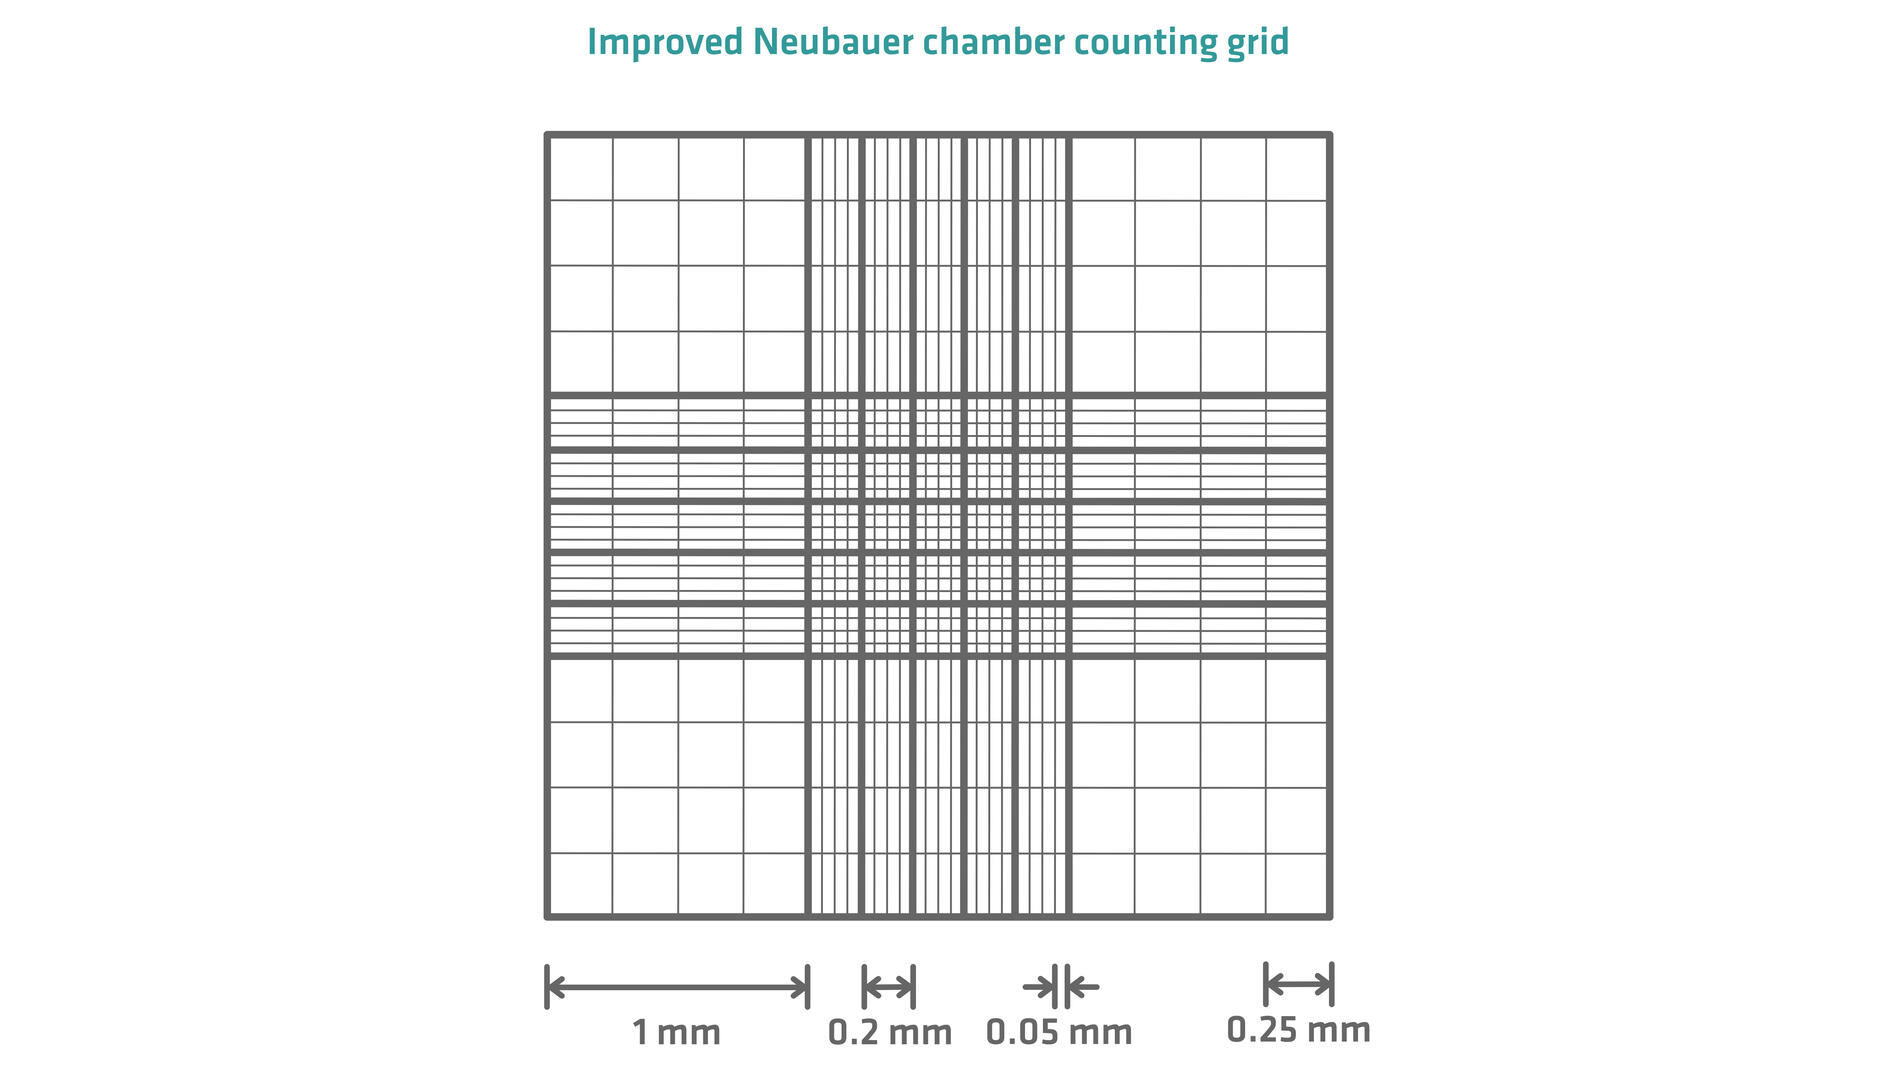
The counting grid of an Improved Neubauer chamber consists of a grid of 3x3 large squares, each measuring 1 mm². These large squares are divided into the following smaller units:
- The 4 corner squares are divided into 16 medium squares of 0.25 x 0.25 mm each, and allow larger or less concentrated cells to be counted, e.g. white blood cells
- The central square is divided into 25 medium squares of 0.2 x 0.2 mm, each further divided into 16 small squares of 0.05 x 0.05 mm, and allows smaller more concentrated cells to be counted, e.g. red blood cells
- The 4 remaining large squares are typically not used for counting
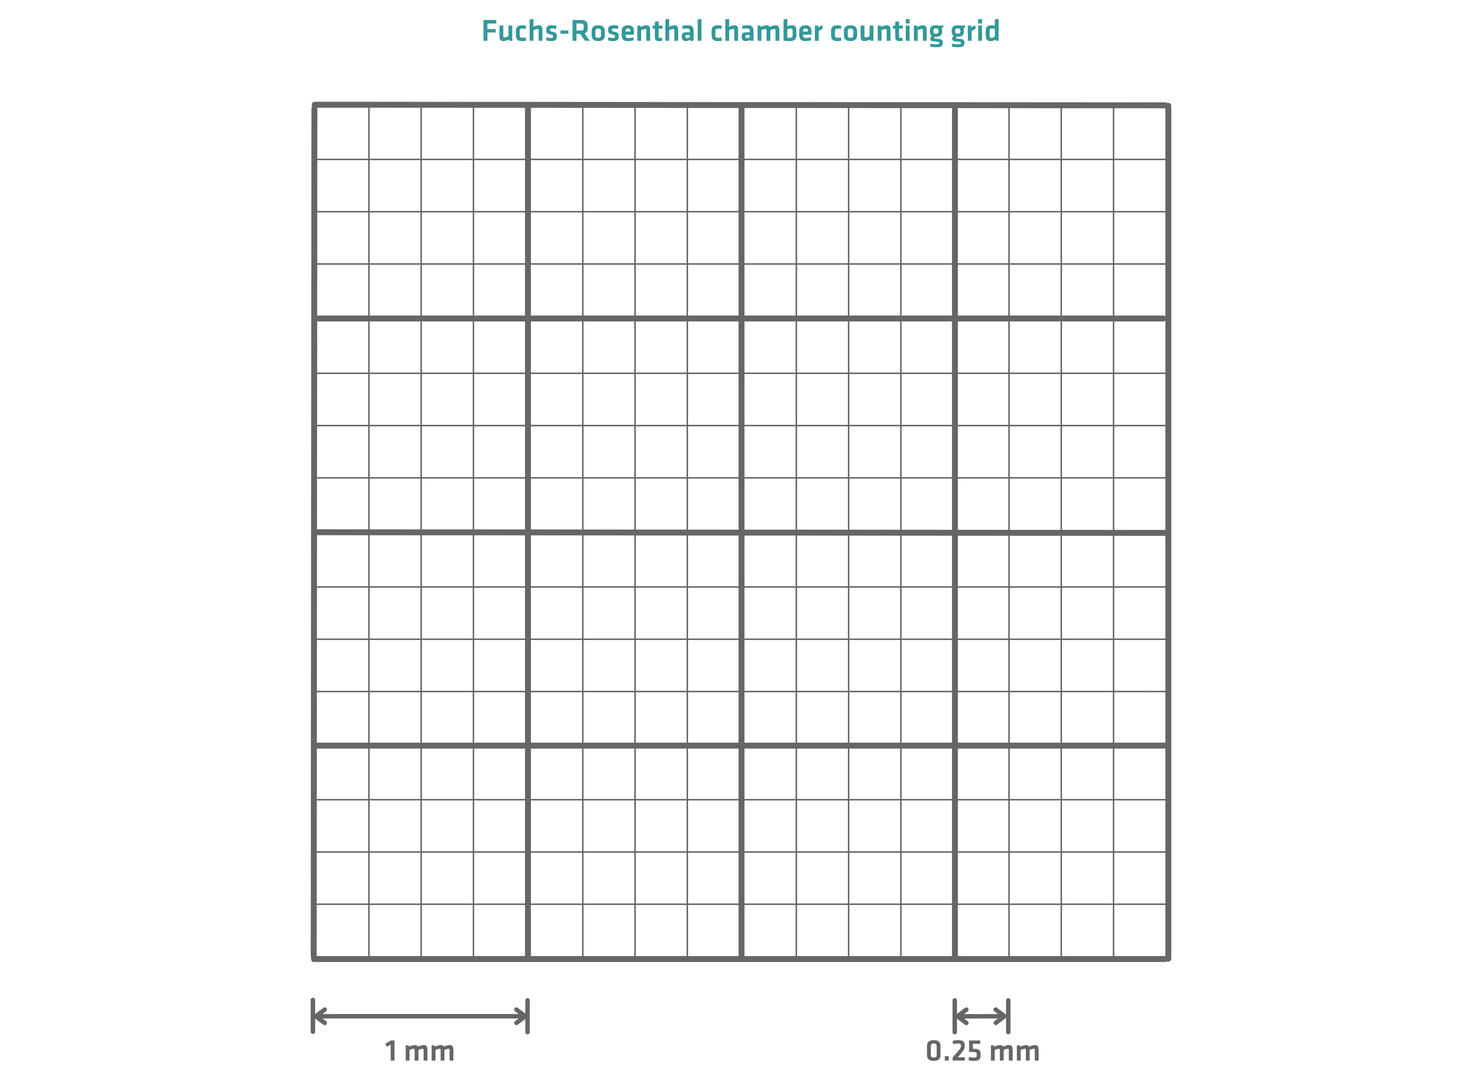
Another widely used hemocytometer is the Fuchs-Rosenthal chamber. It features a larger counting area of 16 mm2, divided into 16 large squares each measuring 1 x 1 mm. These large squares are subdivided into 16 smaller squares with a side length of 0.25 mm. The height of the Fuchs-Rosenthal counting chamber is 0.2 mm. The larger counting area and increased height make the Fuchs-Rosenthal chamber ideal for samples with low cell concentrations, like cerebrospinal fluid.
How to use a hemocytometer
Using a hemocytometer to effectively count cells requires attention to detail and consistent technique. The following step-by-step guide describes the procedure.
Materials needed:
- Hemocytometer with coverslip
- 70 % ethanol
- Cell suspension
- Trypan blue or other viability stain (optional for viability assessment)
- Micropipette and tips
- Microscope
- Counter (manual or electronic)
Step-by-step procedure:
1. Prepare the hemocytometer
- Clean the hemocytometer and coverslip thoroughly with 70 % ethanol and wipe the components dry or let them air dry.
- Place the coverslip on top of the counting chamber, ensuring it sits flat on the raised supports. When the coverslip is ideally placed, Newton's rings (rainbow patterns) between the coverslip and the raised supports will indicate proper contact.
2. Prepare the cell suspension
- Ensure your cell suspension is well mixed and homogeneous, with individual cells separated from one another. For adherent cells, this typically involves trypsinization followed by neutralization and resuspension to detach them from the culture vessel.
- Depending on the estimated cell concentration of your suspension and the grid size of your hemocytometer, you may need to dilute a sample of it in order to get a countable number of cells. If regularly running cell counting experiments with similarly concentrated cell suspensions, you will know the required dilution factor. If not, you may need to load the hemocytometer a few times with varying sample dilutions to find the ideal dilution factor, ensuring cells are spaced out and don't overlap.
- If you also want to assess the cell viability of your cell culture suspension instead of only determining its concentration, mix a sample of it with trypan blue (typically at a 1:1 ratio). Trypan blue stains dead cells as it can penetrate their damaged cell membrane, whereas viable cells remain unstained. Alternative viability stains with similar working mechanisms are available too.
- Write down the final dilution factor of your cell suspension sample; you will need it for the calculation step.
3. Load the sample
- Gently mix your cell suspension sample using a micropipette immediately before loading to prevent settling.
- Carefully dispense the loading volume indicated by the manufacturer of the hemocytometer at the edge of the coverslip, next to a counting chamber. If you're working with an Improved Neubauer chamber, the amount needed to fill a side is typically 10 µl.

- The liquid should flow into the chamber by capillary action without bubbles or overflow. If bubbles form or the chamber overflows, clean and reload the hemocytometer.
- If you wish, you can load a second aliquot of your sample into the second chamber. Duplicate counts increase result reliability.
- Let the hemocytometer sit undisturbed for a few minutes to allow cells to settle evenly.
4. Count the cells
- Place the hemocytometer on the microscope stage and locate the grid. Determine the magnification needed to clearly see the cells.
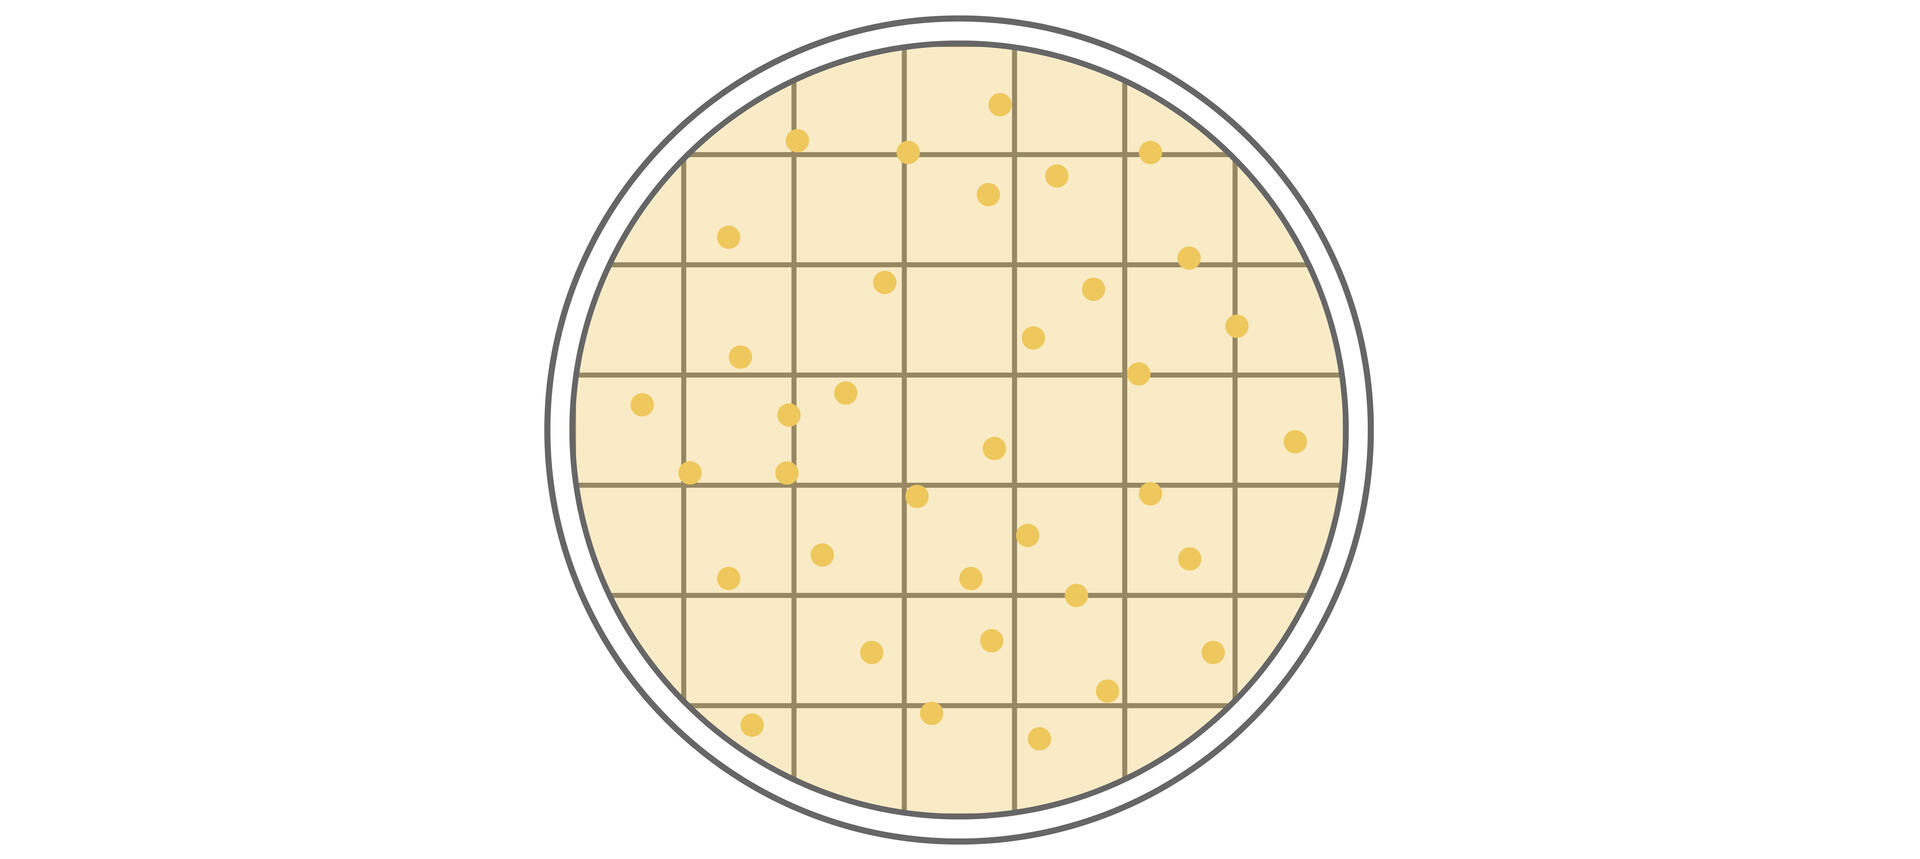
- Define in which squares you want to count the cells. When working with an Improved Neubauer chamber, it is common practice to count bigger or less concentrated cells in the 4 large corner squares and the center square. Smaller or more concentrated cells are typically counted in the center square by counting 80 of the smallest squares. Note that these 80 squares should be evenly distributed across the center square. You could, for example, count all the cells in the 5 medium squares forming a diagonal, or all the cells in the 5 medium squares in the corner and the middle.
- Make sure that you don't count cells twice, and establish a convention for cells touching outer lines. A commonly used rule is to count cells touching the top and right lines, but not those touching the bottom and left lines.

- For viability assessment, count blue (dead) and clear (viable) cells separately.
Hemocytometer calculations
Converting raw cell counts into concentration and viability values involves straightforward calculations based on the hemocytometer's defined geometry.
To determine the cell concentration of your cell suspension, you need to multiply the average number of cells per square by the final dilution factor of the counted sample and divide this by the volume of a square:
Cell concentration = (average number of cells per square x final dilution factor) / volume of a square
For example, let's assume that you mixed 1 part of your suspension with 9 parts of diluent. This gave a dilution factor of 10. Then, you mixed 1 part of this dilution with 1 part of trypan blue, resulting in a final dilution factor of 20.
When loading this cell suspension sample into an Improved Neubauer chamber and counting cells in the 4 large corner squares and the large center square, you obtained the following values:
- Square 1: 85 cells (80 viable and 5 dead)
- Square 2: 76 cells (69 viable and 7 dead)
- Square 3: 93 cells (85 viable and 8 dead)
- Square 4: 82 cells (78 viable and 4 dead)
- Square 5: 79 cells (74 viable and 5 dead)
This means that you counted a total of 415 cells (386 viable and 29 dead) and an average number of 83 cells per square. As each large square has a side length of 1 mm and a height of 0.1 mm, its volume is 0.1 mm3 or 0.0001 ml.
The cell concentration of the initial suspension therefore is 16.6 x 10⁶ cells per milliliter:
Cell concentration = (83 cells x 20) / 0.0001 ml = 16,600,000 cells / ml = 16.6 x 10⁶ cells / ml
As you used trypan blue for this experiment and calculated the number of viable and dead cells separately, you can also assess cell viability of your suspension using this formula:
Viability (%) = (number of viable cells / total number of cells) x 100
Viability (%) = (386 / 415) x 100 = 93.01 %
Alternative cell counting methods
Hemocytometers are a standard method for cell counting as they are cost effective, reusable, and a versatile tool for counting virtually any cell type. They also provide simultaneous quantification and viability information using only small amounts of cell suspension. However, hemocytometers do have their limitations. For example, hemocytometer cell counting can be time consuming, especially for multiple samples. Another issue is their vulnerability to user errors and user-to-user variability, which lead to a lower accuracy and precision than automated systems. This is why several alternative techniques have been developed, offering different advantages for specific applications.
Plating and CFU counting
Another traditional manual method that can be used for cells growing in colonies is cell plating and CFU (colony-forming unit) counting. As the name implies, cells are first diluted, plated and cultured. After incubation, viable cells will have formed a colony that can be counted.
Compared to hemocytometers, the time-to-result is longer and the method is less reproducible, as not all viable cells will form a colony and some might stick together and form only 1 colony. However, this technique can be useful for counting small bacterial cells, and, as you can add drugs to the growth medium or alter the culture conditions, you can quantify the number of cells resistant to certain compounds or external factors.
Coulter cell counting
Coulter counters use electrical impedance to count and size cells. A conductive solution containing suspended cells flows through a small aperture that is part of an electrical circuit. Each cell passing through the aperture temporarily increases the electrical resistance due to its non-conductive nature. This change in resistance is proportional to the cell's volume, enabling both accurate cell counting and size determination.
Coulter counters are relatively expensive and cannot distinguish between live and dead cells, but as the workflow is fast and automated, they are ideal for high throughput applications requiring precise results.
Flow cytometry
In flow cytometry, cells are first stained with fluorescent dyes and then directed through a narrow channel. This allows for cell counting, as they pass single-file through a laser beam in the channel. The way each cell scatters light, along with the fluorescent signals that it emits, provides additional information about its size, granularity, viability and other characteristics.
Flow cytometers are expensive and complex to use. However, their high throughput, accuracy and sensitivity make the method ideal for multi-parameter analyses of culture samples.
Image-based cell counting
Image-based cell counting combines automated microscopy with computational analysis to count and characterize cells. Samples – often stained with markers – are scanned using high resolution imaging systems. Sophisticated software and AI algorithms then identify individual cells, analyzing parameters like count, size, shape and fluorescence.
Just like Coulter cell counting and flow cytometry, image-based cell counting is more expensive than using a hemocytometer. However, it may be interesting for high throughput labs as it offers a fast and automated alternative to manual cell counting, and produces additional insights beyond just cell counts.
Spectrophotometric cell number determination
Spectrophotometry measures the optical density (OD) or proportion of light of a certain wavelength that is absorbed by a cell suspension sample. For example, if you have a liquid bacterial culture with Escherichia coli, you can measure the OD at a wavelength of 600 nm (OD600) and compare this value to the results obtained from standard samples with known concentrations to determine cell density.
As there's no need for sample preparation when using a spectrophotometer, the method is much faster than using a hemocytometer and is particularly useful for bacterial cultures with millions or even billions of cells per milliliter. However, it cannot distinguish between live and dead cells and can only be applied if standard samples with known cell concentrations are available.
DNA quantification
Cell number determination by DNA quantification relies on measuring the total DNA content in a sample to estimate cell numbers. Cells are first lysed to release their DNA, which is then stained with a fluorescent dye. The fluorescence intensity of the sample – measured by a fluorometer or plate reader – can be compared to a standard curve generated from samples with known cell numbers to determine the total cell count in the sample.
This method is highly sensitive and suitable for high throughput labs, as microplate readers can analyze the fluorescence intensity of multiple samples in parallel. However, it does not distinguish between live and dead cells, requires standard samples with known cell concentrations, and includes various sample preparation steps.
Metabolic activity assays
Metabolic activity assays measure cellular metabolic processes, such as the production of ATP, in the cell culture medium. By quantifying the conversion of specific substrates into measurable products, cell numbers can be indirectly determined.
While being highly sensitive and scalable to varying throughput requirements, metabolic activity assays can only quantify viable, metabolically active cells, which means that they are mostly used for applications like drug screening or toxicity testing.
Conclusion
Despite the invention of more advanced counting methods, the hemocytometer remains an essential tool in biological and biomedical research. Its reliability, versatility and cost effectiveness make it the method of choice for many applications.
Mastering hemocytometer cell counting requires understanding both the theoretical principles and practical techniques involved. Whether you're using an Improved Neubauer chamber, Fuchs-Rosenthal or another grid design, the basics remain the same: careful sample preparation, meticulous counting technique and proper calculation. These skills are key to obtaining reliable cell counts, and in this article we have outlined the most important guidelines forming the basis for successful experiments.
Ask our expert. Leave a comment!
Write us if you have any questions regarding the blog article.